

When you create a new QuickBooks Online company, take the time to review the settings and make sure your business gets off on the right foot.
Account & Settings is where a small business owner can customize their QBO experience. From communications with vendors and customers to detailed accounting settings. Reviewing these options will allow you to convey the image you want to your customers and give you the information you need to manage your business.
One account, multiple QuickBooks Online companies
You can have multiple QuickBooks Online companies under one account. Each company will need its own subscription plan.
If you currently have multiple companies under multiple accounts, you can merge them.
Here’s how:
- Sign in with the account you no longer want to use
- Send an invite to the account you do want to use
- From the company you want to switch accounts on
- Choose “Company Admin” as the user type
- Open the email for the account you want to use – click the invite link
If you can’t send an invite, you don’t have the correct administrative privileges.
QuickBooks Online settings
Click the gear icon in the upper-right
Select Account & Settings.
Credit: qbo.intuit.com
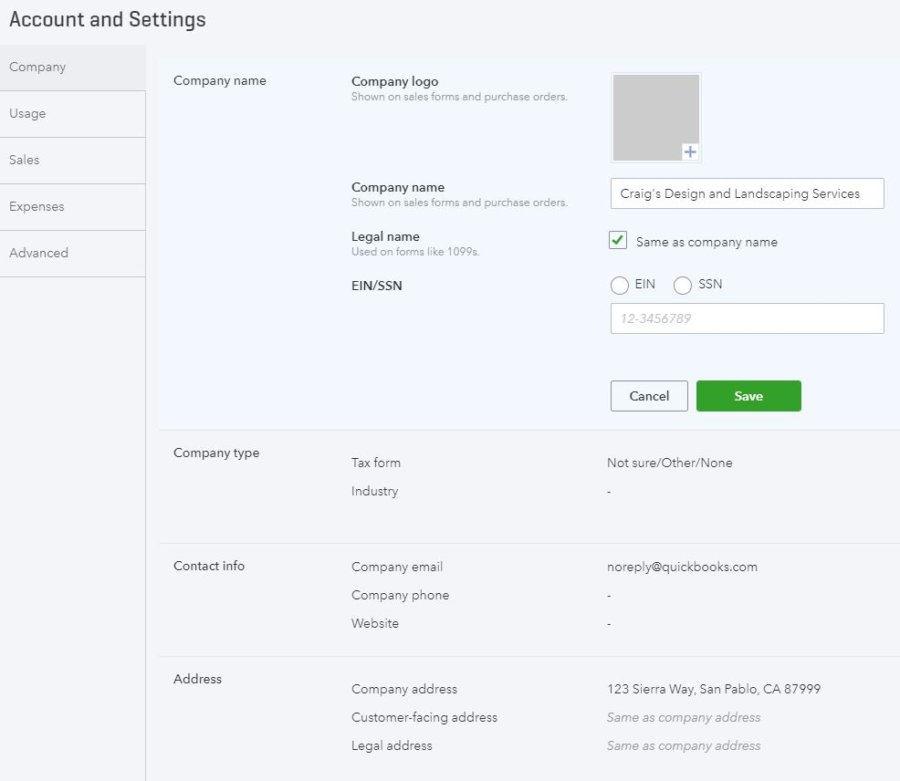
Company settings
These fields are pretty straightforward. They will appear on documents such as invoices, sales receipts, and customer estimates.
All of this is required, so I would suggest filling all applicable fields completely.
Company name – Pretty self-explanatory. You’ll enter your EIN/SSN here too.
Company type – LLC, Sole Proprietor, Corporation, etc… Also, your industry will be entered here.
Contact info – Email, phone, and website.
Address – Includes company, customer-facing, and legal address.
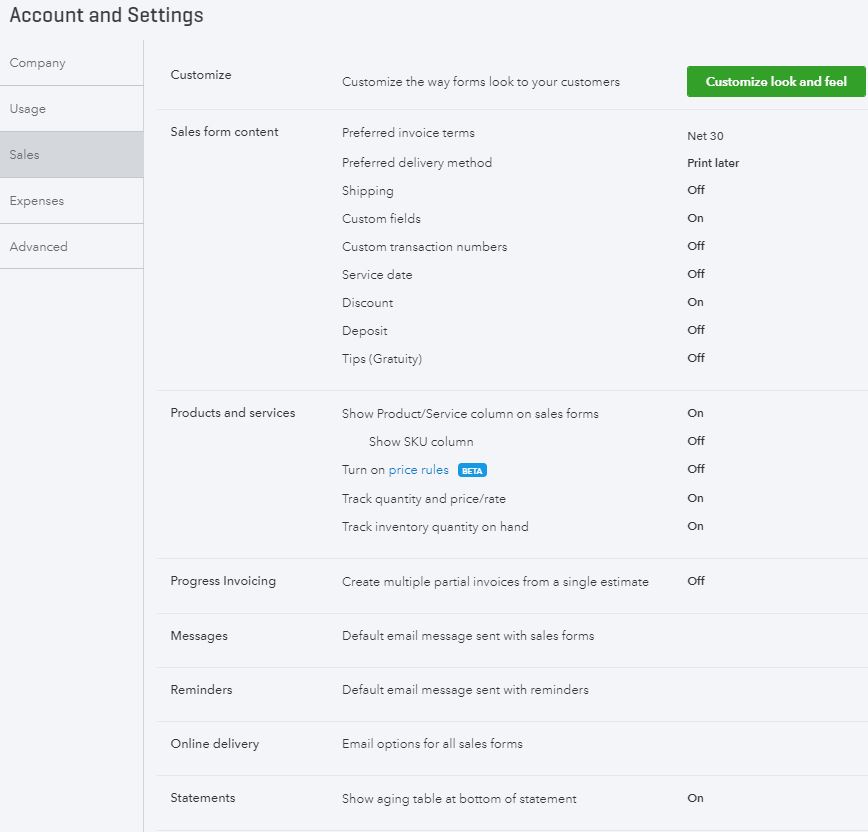
Sales settings
Customize– Choose a template for your invoices. Also, specify payment options and write a subject line for emailed invoices.
Sales form content – Payment terms are entered here. Other information you want to be included on invoices can also be specified. Things like delivery methods, shipping fields, and custom fields.
Products and services – Add columns for SKUs, quantity, and rates to sales forms. If you want, you can also add rules regarding discounts for particular customers here. Don’t forget to turn on inventory while updating this field too!
Progress Invoicing – Set up customer billing for long-term projects – if applicable.
Messages – Customize the text in emailed invoices. This is also where you’d enter email addresses to cc or Bcc invoices to.
Reminders – Similar to Messages. You’ll set up follow-up communication emails here.
Online delivery – Specify if you want your invoices in PDF, HTML, or plain-text format. If you choose to not Attach sales form as pdf, you can take advantage of QuickBooks Online’s tracking functionality for online invoicing.
Statements – These are sent to customers to summarize all outstanding invoice balances. You can decide if you want all of the detail shown for each invoice, or just a single line.
Taking the time to customize the appearance of your invoices will help them stand out. So, consider taking the time to work through these fields.
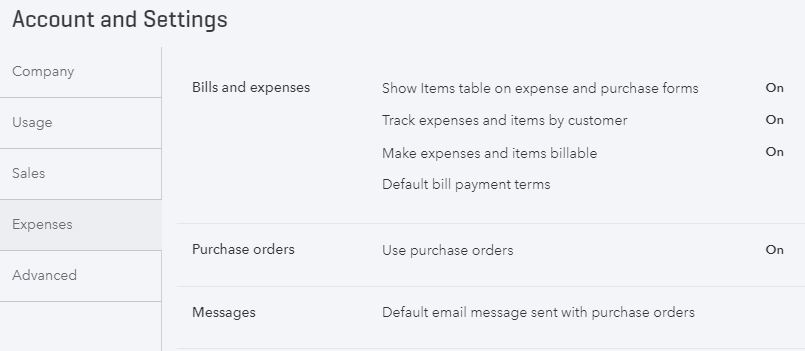
Expense settings
Bills and expenses
Show Items table on expense and purchase forms – Turning this option “On” allows you to see the Items grid when viewing purchase transactions. This is good because it allows you to view reports related to product and service purchases. Note that this option is only available if you have a QuickBooks Online Plus subscription.
Track expenses and items by customer – If you turn this “On,” you’ll be able to select customers when entering expense transactions. This will help you tie costs directly to customers. Also, only available with a QuickBooks Online Plus subscription.
Make expenses and items billable – With this option “On,” you can take expenses and turn right around and bill customers for them. For example, if your customer reimburses for travel expenses, then you would want to utilize this feature. The ability to add a default markup and/or sales tax rate is also available. Again, only available with a QuickBooks Online Plus subscription.
Default bill payment terms – Gives you the option of specifying a default for payment terms. Useful for helping to manage cash flow if your vendor doesn’t set its own terms.
Purchase orders
Use purchase orders – Allows you to add another level of tracking for purchases. Turning this “On” will let you create custom fields in purchase orders. Also, you can automate the creation of serial numbers and transaction numbers. Only available with a QuickBooks Online Plus subscription.
Messages
Default email message sent with purchase orders – If you decide to use the purchase order feature, this is where you can enter a custom message to appear at the bottom of every PO.
Payment settings
In order to accept payments from an emailed invoice, in person, or over the phone, you will need to create a QuickBooks Payments merchant account.
There are two plans to choose from.
- The first has no monthly fee, but you’ll pay a higher percentage rate per transaction
- The other plan has a monthly fee, but a lower percentage rate per transaction
With a merchant account, you can take American Express, Visa, MasterCard, and Discover.
With a merchant account, you can include a “Pay Now” button with your emailed invoices. This will allow customers to make immediate payment. They can do so with a credit card or via ACH. If they choose ACH, there is no fee to you.
If you use the mobile app, you can take payments via a card reader attached to your phone.
Another big advantage of using a QuickBooks Payments merchant account is that every time you get paid, the accounting transactions get made too! Plus, payments are automatically matched with invoices.
Oh, and if you’re using a bookkeeper/accountant, they can possibly get a discounted rate for the merchant account.
If you have an existing merchant account, you can just connect it to your new QuickBooks Online company.
Advanced settings
As the name implies, this is where you can tweak the finer points of your QuickBooks Online account. Unless you have a good grasp of what you’re doing, you might leave these settings to your bookkeeper/accountant. Make sure they know you well if you get third-party help though. The combination of settings you use here is highly dependent on the nature of your business.
These settings can be changed at any time. It’s best to address them when you set up your new QuickBooks Online company.
Accounting
Accounting – Specify the first month of your fiscal year and income-tax year. Plus, if you want to use an accrual or cash-based accounting method. This is also where you will close your books and set your password.
Chart of Accounts – Here, you can opt to use GL account number and set defaults for things like billable expenses, discounts, and shipping.
Other advanced settings
Categories – This setting is where you specify if you want to Track Class or Track Location. Turning this on will include a special field on your forms. Classes can be almost anything you want. For instance salespeople, partners, lines of business, and departments. Location tracking allows you to track inventory by warehouse, area, aisle, bin, etc.
Automation – If you’d like to populate fields on forms based on information entered previously, you can turn this option on. This can save time if you find yourself entering the same information repeatedly.
Projects – Some businesses are more project-based. Contractors, for instance. If you utilize this feature you can track sales, expenses, and timesheets by project.
Time tracking – This setting allows you to add a Service field to timesheets. Doing so will match employee on-the-clock time with services provided to customers. The billing rate and first day of the workweek are entered here too.
Currency – Conducting business in multi-currency is available in QuickBooks Online. Be careful with this setting, though. Once it’s turned on, it can’t be turned off. Extra fields will be added to your QBO database. If you’re importing data, this must be turned on before the import. Finally, you can’t change your home currency. If you conduct business in other currencies, then this setting will obviously be useful.
Other preferences – These are settings that don’t fit in any other category. Things like date and number formats. You can also dictate how you want to address customers (donors, clients, customers, etc.). Plus, be sure to turn on the option that warns you if duplicate bill or check numbers are used.

Create new QuickBooks Online company
That’s a summary of the settings that you should review when you create a new QuickBooks Online company.