Products and services can be easily added and maintained in QuickBooks Online.
Products and services in QBO are the items you buy and sell to conduct business. Keeping this list of items well maintained will help ensure that your sales and purchase forms have the information they need. It will also contribute to more useful reporting for your small business.
What are products and services in QuickBooks Online?
Products and services are the items that appear on sales and purchase forms. If you plan on using these forms, then you should take the time to enter all your products and services into QBO.
Each item will be linked to an account in your Chart of Accounts. Every time a product or service transaction takes place, an entry is made.
Whether you sell products, services, or both depends on the industry you’re in and the nature of your business.
Inventory
These are products that you purchase and/or sell. Inventory quantities are tracked. In order to manage inventory, you must have a QBO Plus subscription.
For example, if you own a boutique clothing store, the clothes you sell would be inventory.
Non-inventory
These are items that you buy and sell but don’t want to keep track of the quantity on hand.
Hand soap for an auto mechanic is an example of a non-inventory item.
Service
This is something that you sell which is intangible.
Delivery of your product is an example.
Bundle
A grouping of products and/or services that you sell together.
A restaurant that offers a meal (main, side, and drink) is an example of a bundle.
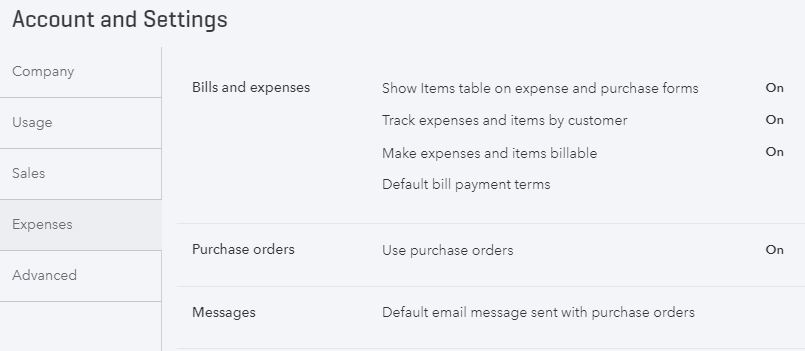
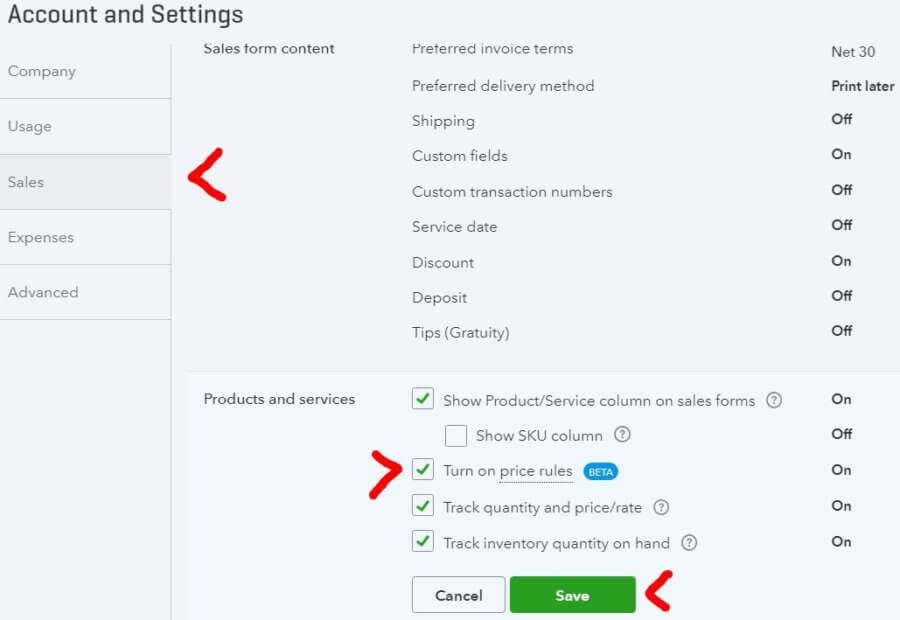
Products and services settings
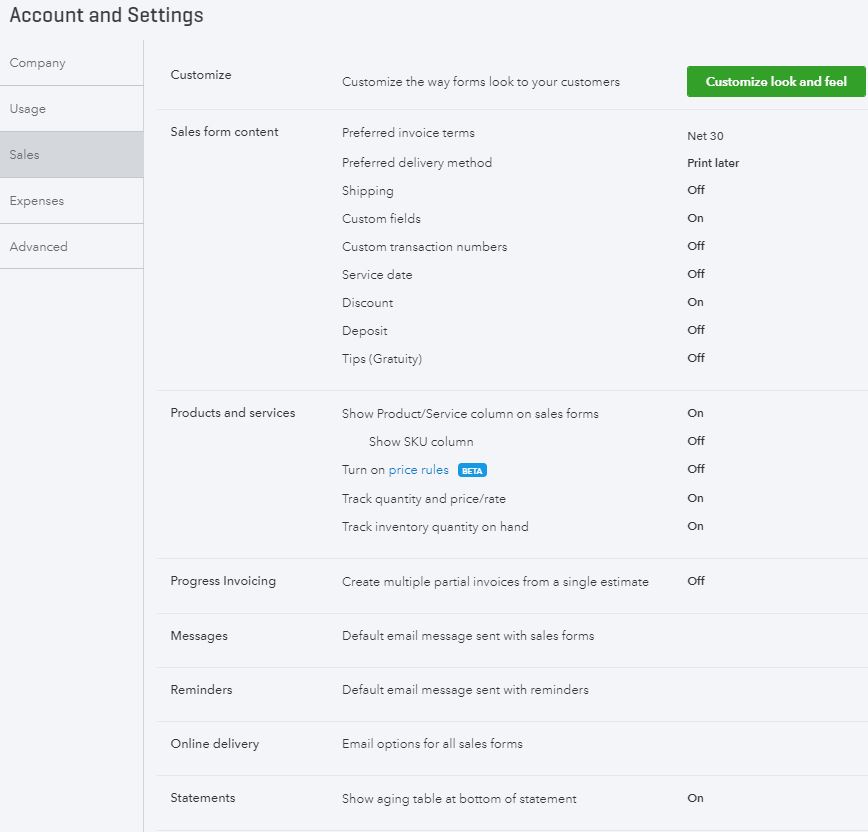
If you’ll remember, Products and Services settings are accessed by clicking the gear icon in the upper-right. Then Accounts and Settings (below Your Company).
Products and services settings are a sub-section of Sales settings. Check the box next to the features you want to utilize and click “Save” when you are finished.
Show Product/Service column on sales forms
This option must be turned on in order for the product/service column to appear on sales forms. If it is off, your customers won’t see details about the products and services involved in the transaction.
Show SKU column
SKUs are used to track inventory. Turning on this feature will add a SKU/barcode column to sales forms. If you have a considerable amount of inventory to track, you should check the box to turn this on.
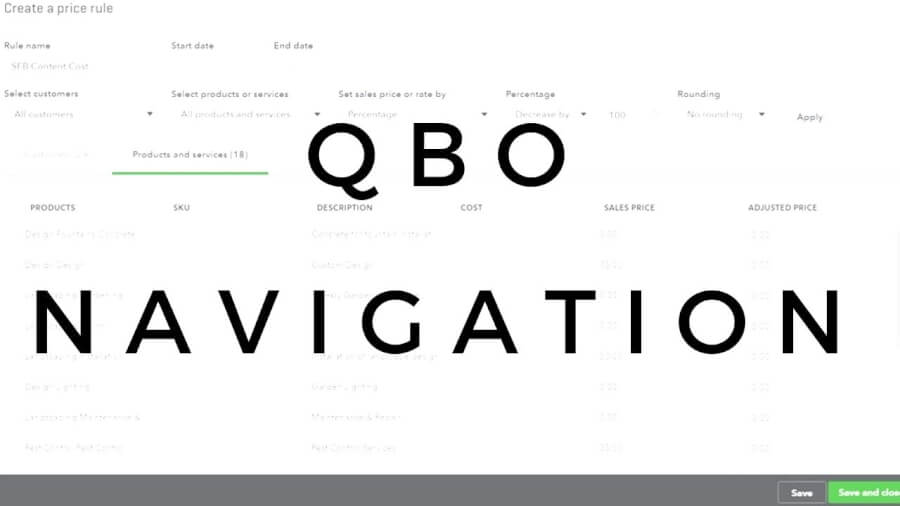
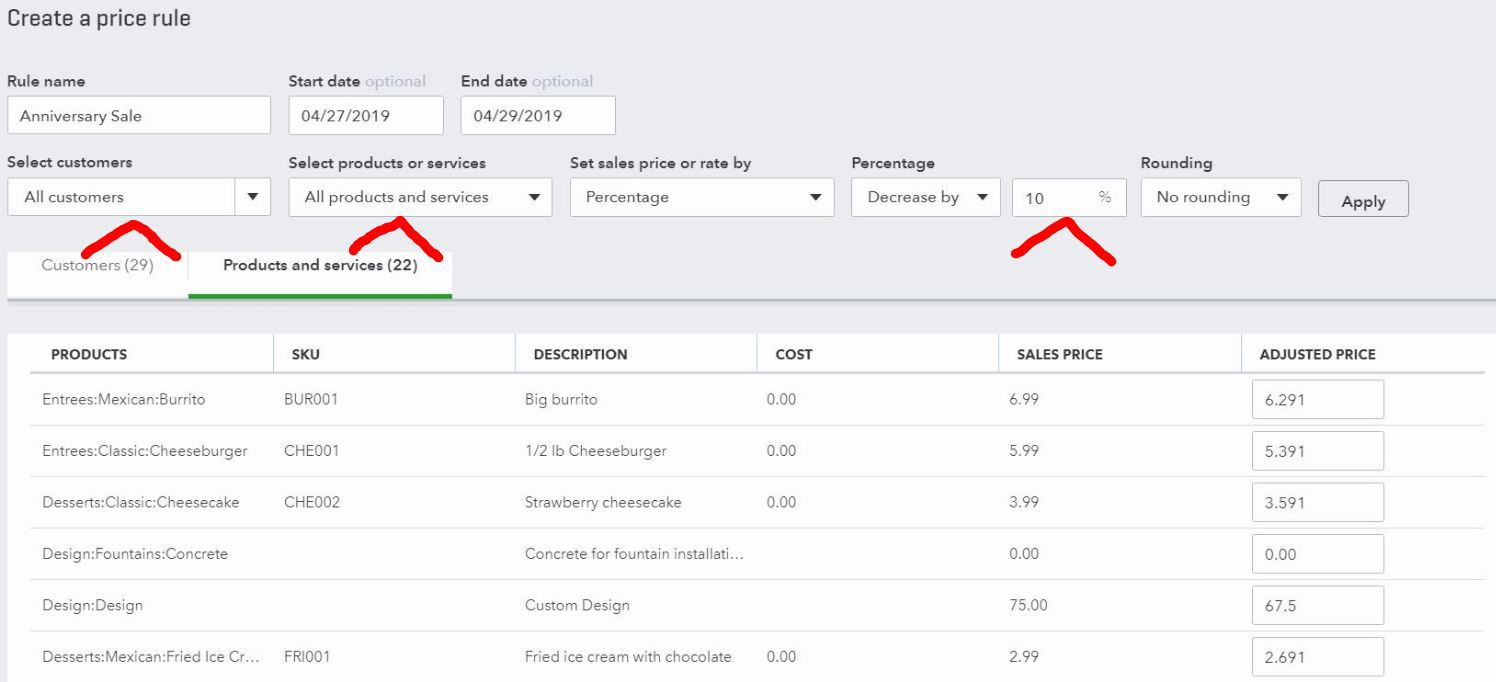
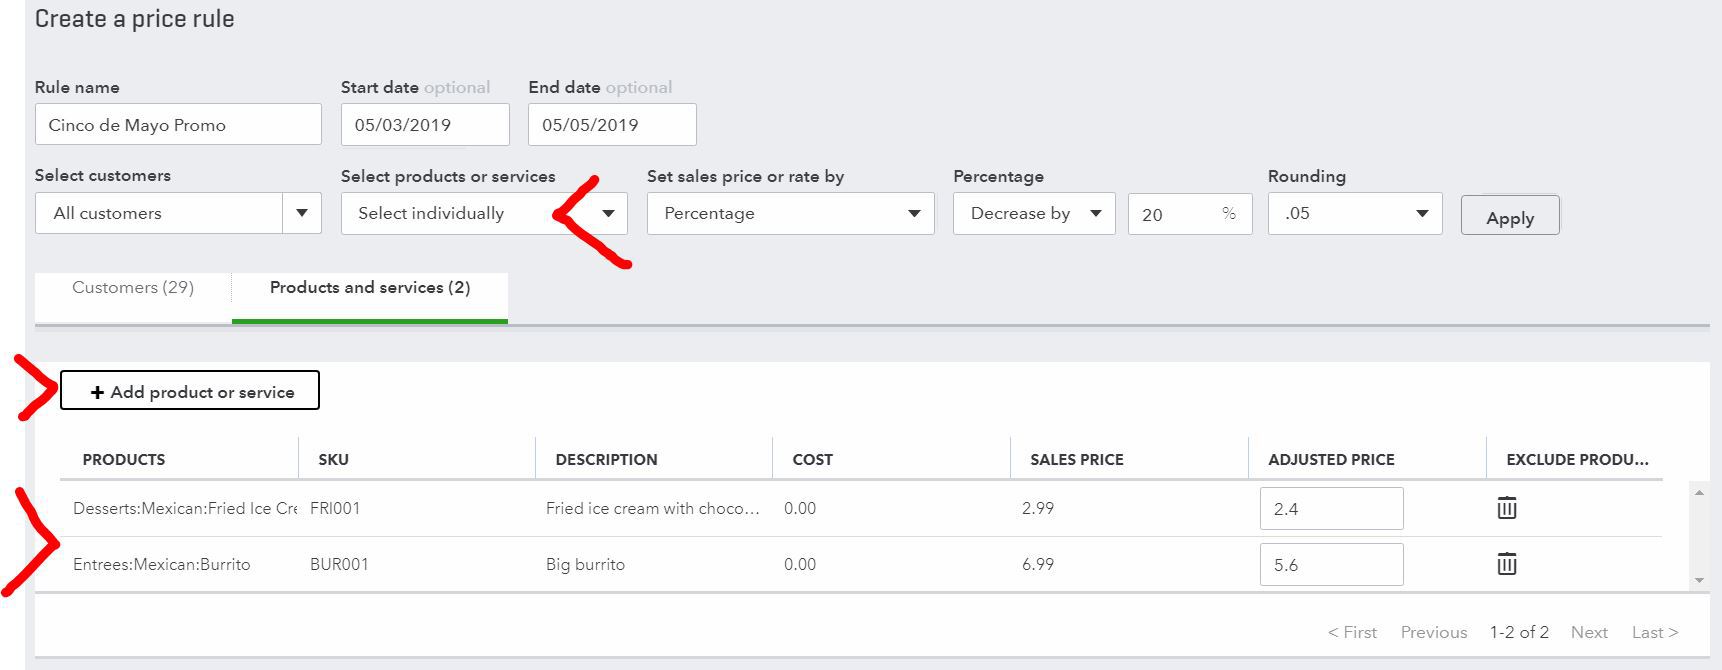
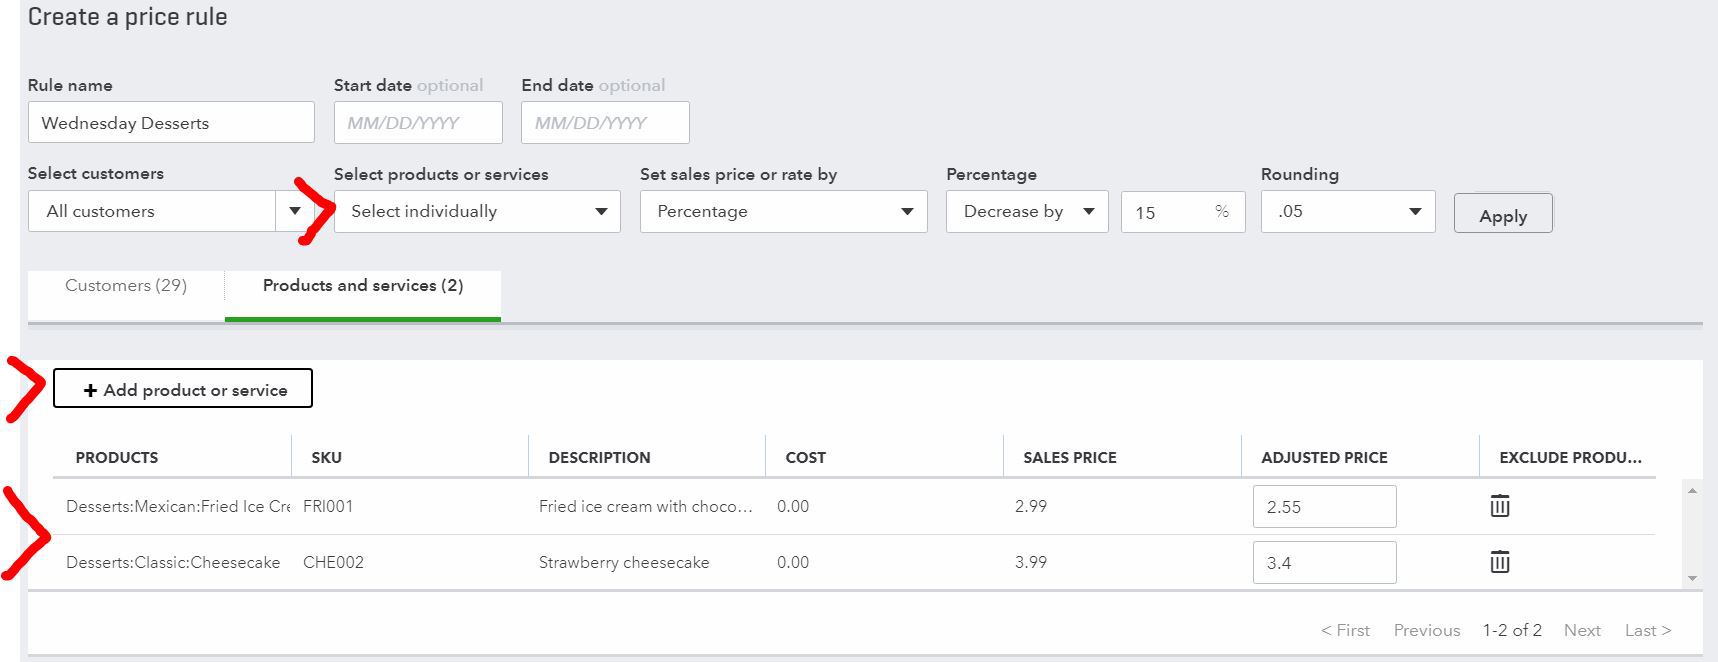
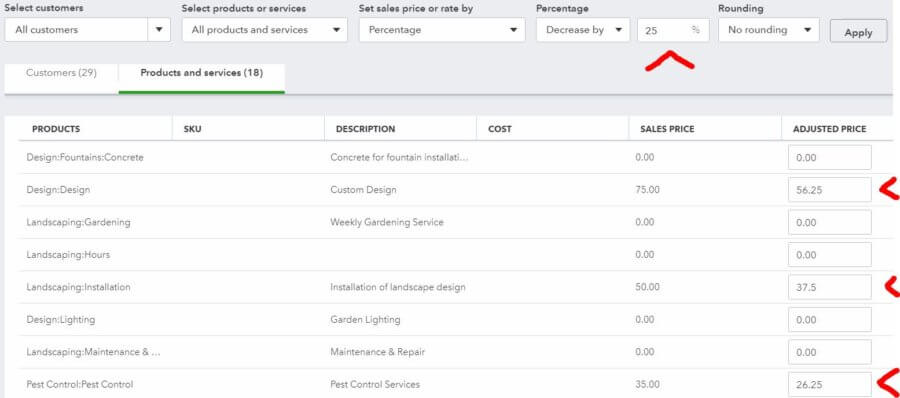
Turn on price rules
Read this post to learn more about price rules. Price rules allow you to give discounts on certain products and to certain customers.
Track quantity and price/rate
Turn this on too if you track inventory. It will add rate and quantity fields to estimates, invoices, and sales receipts.
Track inventory quantity on hand
Another feature that should be turned on if you plan to track inventory. Once you do, QBO will keep track to stock levels for products.
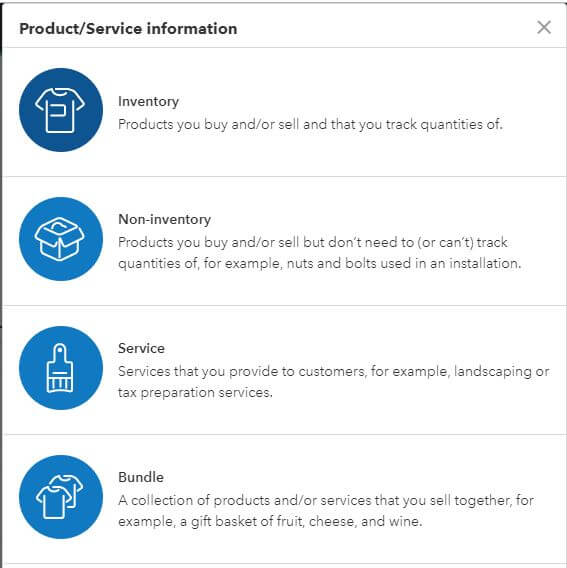
How to add products and services to QuickBooks Online
Every product or service you add will start with clicking on the gear icon in the upper-right part of the screen. From here, you will select “Products and Services” underneath Lists.
Next, select click on the green New button.
Choose whether you want to add an Inventory item, Non-inventory item, Service, or Bundle.
There are several fields to complete here. The more detailed information you can provide, the better your reporting will be in the future.
Keep in mind that the available fields will be slightly different depending on the type of item you’re adding.
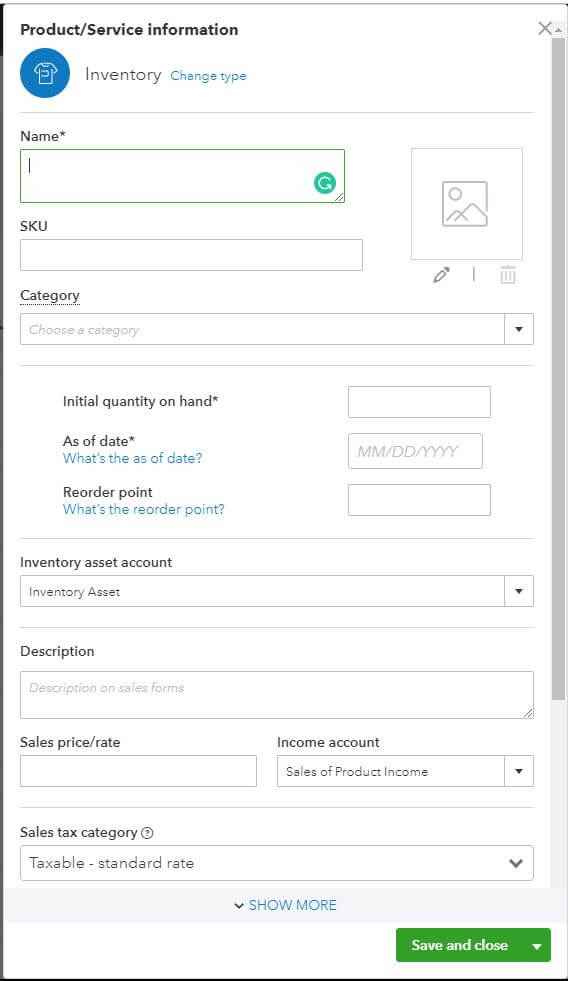
Name and SKU
Name is a description of the product or service. Make it detailed enough, but be aware of the space it will take up on forms and reports.
SKU is a unique combination of letters and numbers used to identify a product or service. You can look at it as shorthand for a given product or service.
Category
If you have many products and services, you can group similar ones into categories. Doing so will allow you to better organize your items.
Initial quantity on hand (Inventory)
Enter the number of units you had in stock on the As of date (below). If your As of date is today, then enter your QOH right now.
As of date (Inventory)
This is when you will begin tracking inventory levels. The As of date can be any date in the past. Your current inventory level will depend on the Initial quantity on hand (above) and the inventory transactions that have taken place since the As of date.
Reorder point (Inventory)
If you would like to be alerted if the quantity on hand drops below a specific level – enter that level here.
Inventory asset account (Inventory)
This is the account where the value of your inventory on hand will be recorded for the balance sheet. By default “Inventory Asset” is selected. If you would like to use a different account, select “+ Add new.”
Description
If you are going to offer this product/service for sale to customers, make sure the checkbox is checked.
Also, write a description for the product or service which will show up on customers’ sales forms. This can be the same as the item’s Name or different.
Sales price/rate
This is the standard price you will charge for this product or service. Don’t worry if you want to charge different customers different rates. You can specify that later, in price rules.
Income account
Here, select the appropriate account to record sales of the product/service to.
Sales tax category (Inventory)
If sales tax has not been set up in QBO, then you might not see this field. Best to have sales tax set up correctly so that QBO can keep track of it accurately.
The Sales tax category you choose will determine the amount owed depending on what the item is and where you sell it.
Two options will be available by default ” Taxable – standard rate” and “Nontaxable.” You’ll also have the option to “Choose a special category” if this inventory item is of a specific type.
If you “Choose a special category” you’ll be taken to a list of item types and sub-types. Choose the appropriate item type and click “Done.”

Purchasing information
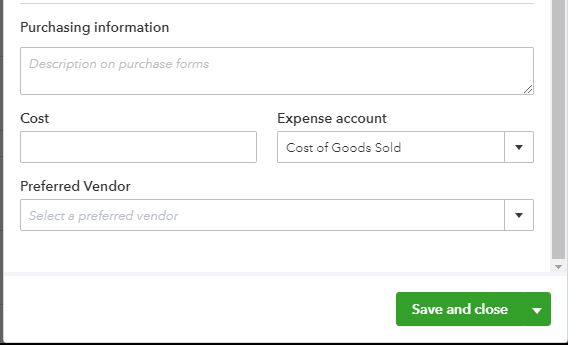
If this is a product or service that you will be purchasing from a vendor, check this box.
Doing so will cause some other options to appear.
Enter the description for this item you’d like to see on purchase forms.
Cost
This is the standard (typical) cost for this item.
Expense account
Like the Income account, this is where purchases of this item will be recorded to.
Preferred Vendor
Choosing a Preferred Vendor for purchased items will speed up purchase order and bill creation.
Select “Add new” if your Preferred Vendor for this item isn’t set up yet. Then, all you’ll need to do is enter a Name for the vendor to make them preferred.
Click Save and close when you’re done.
You’ll then be taken to the Products and Services screen where you will see your newly-created item.
Save time by making duplicates of similar products and services
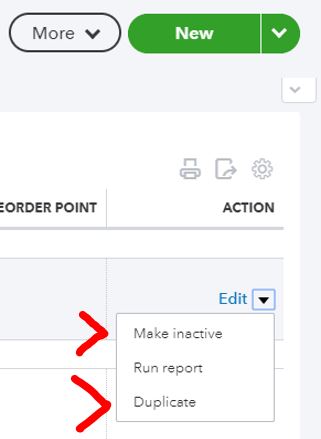
If you’re entering a product/service that is very similar to an existing one – save time by making a copy.
From the Products and Services screen, select the similar product/service and click the down arrow (▼) by the word “Edit” in the Action column. Select “Duplicate.”
The Product/Service Information window will pop up with fields already populated. Make the needed changes and then click “Save and close.”
Importing lists of products and services into QuickBooks Online
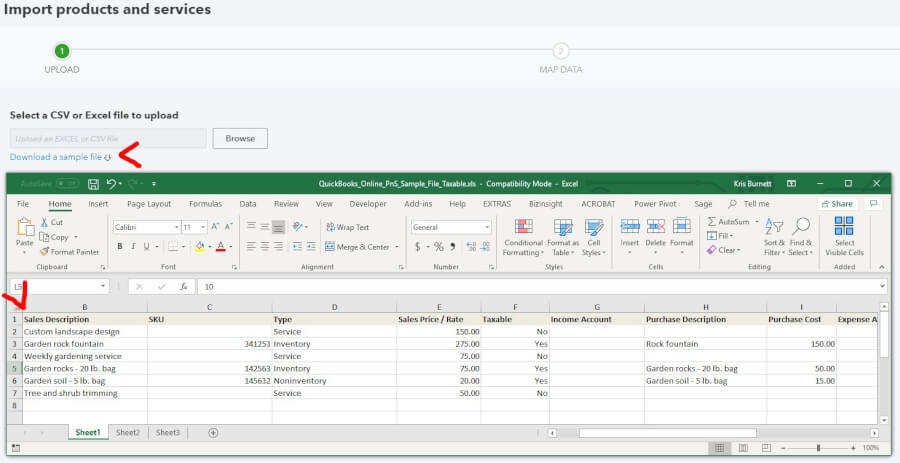
Credit: qbo.intuit.com
If you have a lot of new products and services to set up, you might consider importing them into QuickBooks Online.
You will need to have the items (with relevant information ) in a spreadsheet. By downloading the sample file, you can see the order of the columns and the naming conventions. To avoid error, it’s advised to simply fill in your item information into the sample file. Once you’re done, save the file in a location where you can find it.
The columns included in the sample file will depend on the options you choose when setting up the company (in Account and Settings).
When you’re ready to upload, go to Sales Center and select the Products and Services tab. Choose “Import a file.”
Browse for the saved spreadsheet and select “Open.”
Ensure that all item information is in the correct fields and click “Import.”
Also, here’s a handy tip:
If you want to update your pricing, across-the-board, you can export a product and services list. Then, you can update prices in a spreadsheet and re-import.
Delete a QuickBooks Online product or service
Is your Products and Services list getting cluttered with obsolete items?
You can reduce the clutter by deleting them. Technically, you’re making them “Inactive.” But, the effect is the same.
To do so, click the checkbox on the left-hand side of the page. Then, at the top, select the Batch actions dropdown. Select “Make inactive” then click “Yes” to confirm.
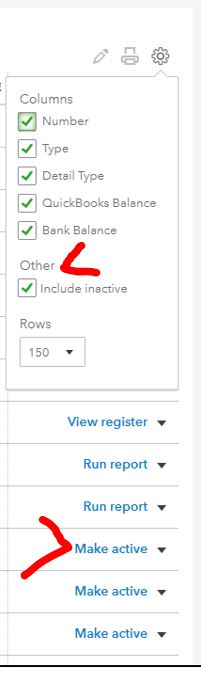
Change the columns in the Products and Services list
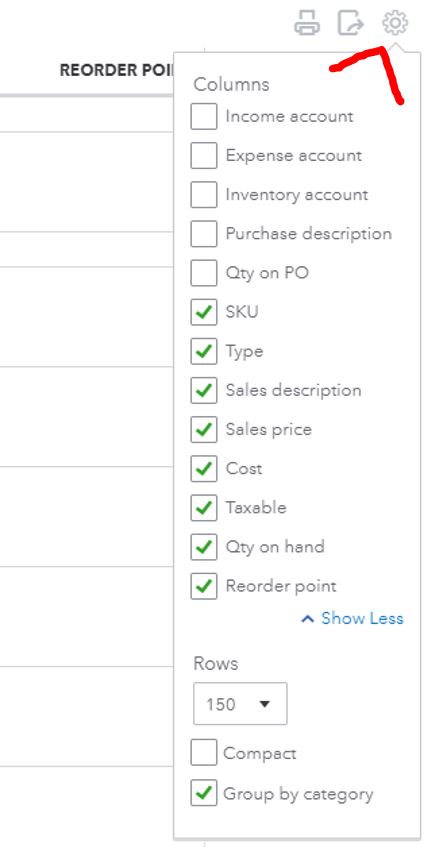
Another action you can take if you feel like the Products and Services list is too cluttered is to remove columns. You can also add them too.
To do so, click the gear icon. Not the one in the far upper right, the one above the Action heading on the right side of the list.
Here, you’ll see every available column (after you click “Show more”). Click the checkboxes to toggle them on/off.
You can also determine how many rows you’d like to see in the Products and Services list. Plus you can “Compact” the list and “Group by category.”
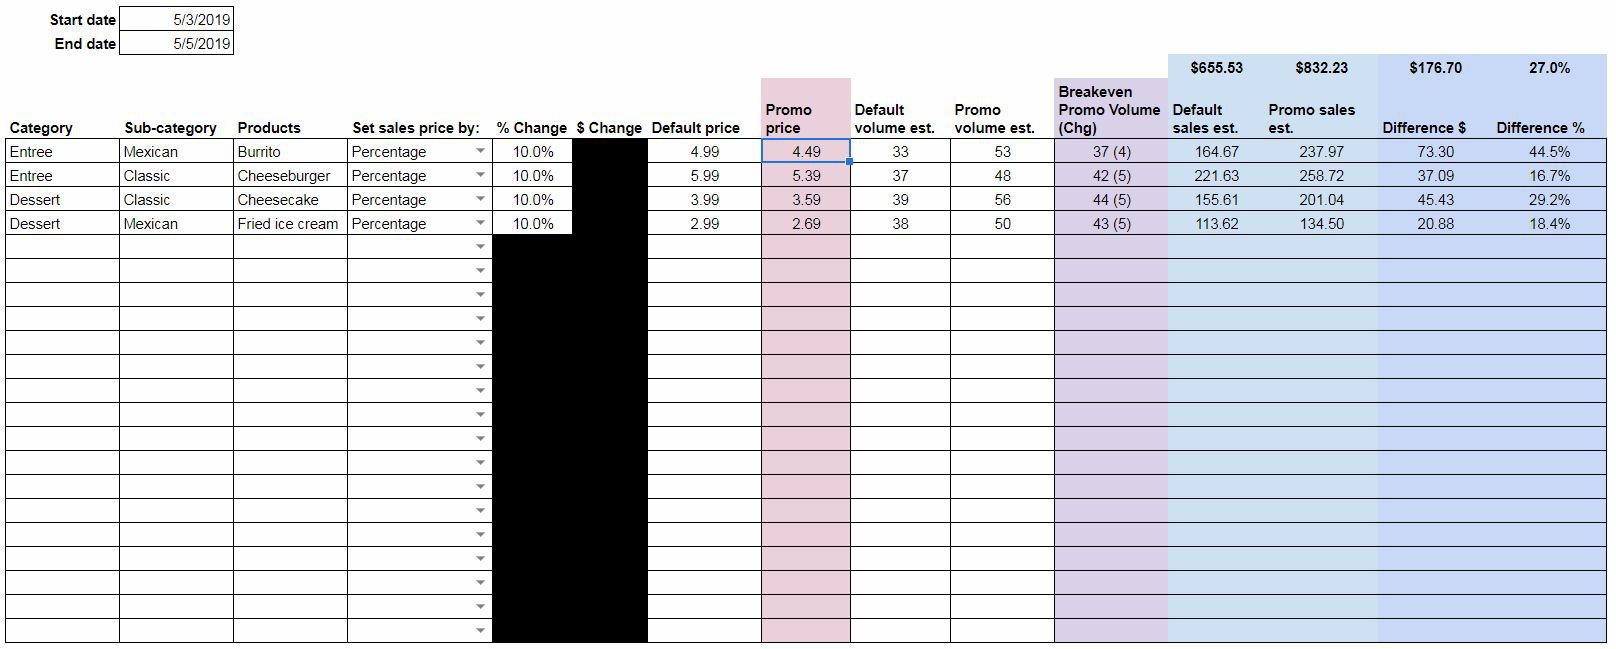
QuickBooks Online products and services
With your products and services set up, maybe you’re ready to run some periodic sales promotions? Read this post to see how to do that in QBO.
Do you have any other tips or tricks for managing your products and services in QuickBooks Online?