What types of user permissions can be set up in QuickBooks online? Video summary
Manage users in QBO by navigating the following:
Gear (icon) > Manage Users (Your Company section) > Add user (button)
Different users have different needs
A Company Administrator can perform all tasks in QuickBooks Online. An example of a Company Administrator is an owner or a trusted manager.
A Standard user is someone that you can pick and choose what they have access to. An employee would be an example of a Standard user.
A Reports only user, as you might expect, only has access to reports. There are exceptions, however. They can’t see payroll information or reports with contact info in them.
Finally, a Time-tracking only user can only see their own timesheet. Nothing else. A subcontractor is someone who might have Time-tracking only permissions.
Creating a new user in QBO
Click on the Gear (icon) and select Manage Users (in the Your Company section).
You will see a list of users.
Next, click Add user (button) and select user type. Your choices will be:
Standard
Company admin
Reports only
Time tracking only
After that, you’ll Select access rights & user settings. These settings are up to you.
After that’s done, you’ll enter the user’s contact info. They’ll then receive a notification via email and will have to sign in to QuickBooks Online to confirm access.
What about payroll access for Standard users?
Granting payroll access is a decision you must make for Standard users.
Granting payroll access is done on the Select access rights (screen).
If Standard usersdo not have payroll access, then individual payroll information will be masked (hidden).
For example, on Workers > Employees, nothing will be shown. The user will receive a notification that they don’t have access rights.
On the Transaction report, payroll entries will mask names. All the Standard user will see is “Payroll.”
Finally, on the Bank register, payroll entries will also mask names. Here too, all the user will see is “Payroll.”
Payroll access is not an option in the sample company. That’s why there is no walkthrough in the video.
Adding company admin access rights + user settings
Determine if this user is your accountant (my accountant). If so, check the corresponding box. You can only have one user as your accountant (my accountant).
Click Next (button) and enter the user’s First name, Last name, and Email. Since they are a Company admin there are no settings to specify.
Entering standard user access rights in QuickBooks Online
For Standard users, the first thing to decide is how much access you want this user to have?
You can give them “All” access. Which is just a little less than a Company admin.
You can give them “None” access.
Or, you can give them “Limited” access; which is access to customer and/or vendor information.
If you give them Customers permissions they will have access to the following:
Estimates
Invoices
Sales receipts
Statements
Charges
Credits
Customers
Products
Services
Sales tax
Receive payments
Run related reporting
If you give them Vendors permissions they will have access to the following:
Bills
Purchases
Vendors
Products
Services
Pay bills
Write checks
Run related reporting
If a Standard user has Limited access rights, they can’t:
Edit accounts
View quantities on hand
View bank registers
See income/expenses
Entering standard user settings in QuickBooks Online
After you determine Standard user access rights, you’ll be asked to specify their settings. There are three determinations to make:
Edit users?
Yes, No, or View only
Edit company info?
Yes or No
Manage subscriptions?
Yes, No, or View only
Finally, you’ll be asked to give their First name, Last name, and Email so that they can log in to QBO and confirm their status.
Reports only access rights/user settings
For users that you only want to give Reports only access – all you need to do is enter their First name, Last name, and Email so that they can log in to QuickBooks Online and confirm their status.
Time-tracking only access rights/user settings
For users that you only want to give Time-tracking access – you can select the appropriate employee or vendor from the dropdown.
If the appropriate employee or vendor is not yet entered into QBO, then you can click Add new and enter their info.
Then, you’ll give their First name, Last name, and Email so that they can log in to QuickBooks Online and confirm their status.
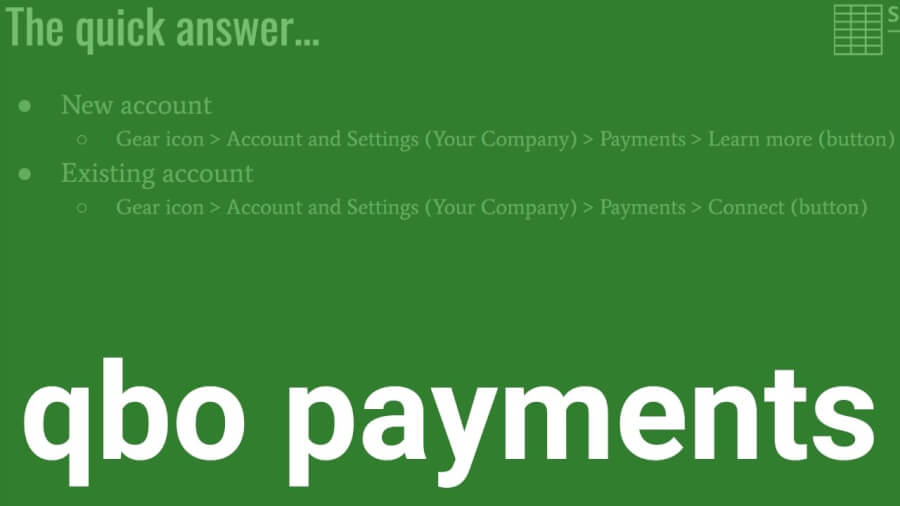
Where and how to sign up for QuickBooks Payments in QBO video summary
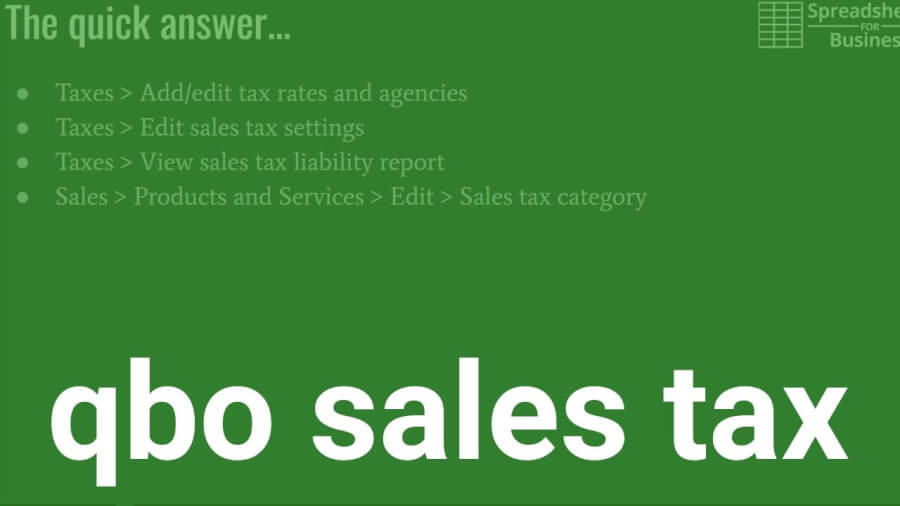
For a new account:
Gear icon
Account and Settings (Your Company)
Payments
Learn more (button)
For an existing account
Gear icon
Account and Settings (Your Company)
Payments
Connect (button)
What does QBO Payments do?
QBO Payments allows your small business to accept payment by:
Credit card
Apple Pay
Bank transfer
There is a “small” fee per transaction for all of the above.
If your customer has prior authorization, they can pay online invoices with “Pay Now” button. They can also pay over the phone. Either option will get you paid quicker.
Customers have the option of entering their credit card information too. All transactions are automatically entered into QBO.
Applying for a QBO Payments account
Gear icon > Account and Settings
Left menu > Payments
Learn more (button)
Set up payments (button)
Section 1 of the application will ask for information about your business Some information will already be populated. So, enter any additional information that is needed and double-check what was auto-filled Click “Next.”
Section 2 of the application asks for owner information. Complete what is needed here.
Section 3 of the application asks for bank information Just search for your bank. When you find your bank, enter your account & routing number.
Connect existing QBO Payments account
If you have one of the following, you can connect it to QBO Payments:
GoPayment
QuickBooks Merchant Services
Intuit Merchant Services
Intuit Check Solution
Click on the gear icon and then Account and Settings.
Then, click on Payments on the left menu.
Finally, click the Connect button.
If you’re having trouble, click Help at the top of the screen and then Contact us. Support will call back and walk you through the process.
If you plan on processing over $7.5K per month be sure to ask for special pricing.
00:00 sales tax and QuickBooks Online how to 00:02 manage the quick answers our first to go 00:09 to taxes and then add or edit tax rates 00:13 and agencies or edit sales tax settings 00:15 where you can edit what you’ve already 00:18 entered and that’s like I said in taxes 00:21 and then the add edit tax rates and 00:25 agencies click new to add a new sales 00:28 tax rate or if you want to enter what 00:33 you’ve sorry edit which you’ve 00:35 previously entered click on edit sales 00:37 tax settings if you want a view 00:41 reporting on your sales tax liability 00:46 you go to taxes again view sales tax 00:48 liability report that is here here you 00:55 can specify the reporting period or put 00:59 in custom dates and you can select which 01:02 tax agency you want to see reporting on 01:05 just change those settings at run report 01:07 and finally any other sales tax setting 01:11 you might want to edit is the sales tax 01:15 category for products and services to do 01:17 that you go to sales products and 01:21 services and you get here you’ll see a 01:26 listing of your products and services 01:28 just click the one you want to edit 01:30 click Edit under the action column and 01:39 towards the bottom of the product 01:41 service information screen you should 01:45 see sales tax category okay so that’s 01:50 quick answers now we’ll get into a 01:52 little more detail about all that so 01:58 before I get into it I want to start off 02:02 with a caveat did recently QuickBooks 02:07 Online has made some changes to the user 02:11 experience and 02:13 I’m getting conflicting information 02:15 between what I see in the sample company 02:17 which is what I use for my examples 02:20 obviously I use that for purposes of 02:22 privacy so I’m seeing a difference 02:24 between that and what I’m seeing 02:28 elsewhere so what I chose to do in order 02:35 to get this video out not sit on it 02:38 forever is to basically cover both ways 02:41 so I guess whatever QuickBooks has got 02:46 going on in terms of that you new user 02:48 interface if it’s affecting you yet 02:52 then you should still be able to use 02:54 this video if it’s not you should also 02:56 still be able to use this video so with 02:58 all that said we’ll get into it here 03:03 capabilities of QuickBooks Online it’s 03:05 supposed to have a sales tax engine it 03:07 makes calculations that basically kind 03:09 of a wizard for figuring out sales tax 03:12 what it does do though once you enter 03:14 information automatically calculates 03:15 every time that you enter an invoice or 03:18 a sales receipt okay so it’s based on 03:21 the location of the sale and the type of 03:24 product and basically everything you 03:26 entered during setup there supposed to 03:29 be a sales tax enter where you can view 03:31 upcoming tax payments see liability 03:33 reports change settings and all that you 03:36 can as I covered in a quick answer still 03:38 do most of that but again 03:40 things have changed somewhat so I can’t 03:44 walk you through an example of the old 03:47 basic setup or any of the old examples 03:50 because again the sample company has 03:53 changed is different than they used to 03:56 be but here’s how the old way used to do 04:00 basic setup and you go to left menu 04:03 taxes and in setup sales tax there would 04:06 be a button there you would confirm your 04:08 address your place of business and it 04:12 would ask you if you needed to collect 04:14 sales tax outside of where your address 04:17 was and you’d click typically no they’re 04:25 in close the window then 04:27 he would also select a filing frequency 04:28 and you’d be giving guidance on that 04:30 based on your locality and the 04:35 anticipated amount of receipts you had 04:37 how often you should file unfortunately 04:40 seems for the time being all that’s gone 04:42 you’re now left to kind of sort it 04:47 figure it all out yourself I would 04:50 assume that’s a functionality that 04:52 they’ll bring back but yeah I don’t know 04:55 like I said things are a little weird 04:56 now as of the recording of this video so 05:00 the new way though you know that I’m 05:02 still go to taxes on the left menu then 05:04 like I said add edit tax rates and 05:06 agencies let that load up and your first 05:14 time you’re probably going to when 05:16 you’re setting it up you’re gonna want 05:17 to click new and you’re gonna choose 05:22 whether you do a single or combined tax 05:26 rate and if you’re not familiar a single 05:31 tax rates pretty straight forward that 05:34 would be like a state sales tax 05:35 now obviously sometimes counties and/or 05:40 cities or you know other other 05:46 governments will implement an additional 05:49 sales tax you know to pay for schools to 05:53 pay for new arenas to pay for whatever 05:57 it is so when they do that when you 06:00 start stacking sales tax rates that’s 06:03 when you’ve got a combined rate okay 06:06 what I would suggest doing until they 06:08 get to a little wizard back up and 06:10 running if they do is to go to this 06:14 address right here sales tax states calm 06:17 and that’s an easy way to look up what 06:21 the sales tax rate is in a specific area 06:23 but I would definitely double check that 06:25 against the appropriate State Department 06:29 of Revenue website just to confirm it 06:35 so once you have it entered if you want 06:39 to edit mention go to edit sales tax 06:46 settings here and this isn’t editing 06:50 being sales tax for one of the 06:54 government entities attended earlier 06:57 this is more general settings you know 07:00 as you can see do you charge sales tax 07:02 where your default sales tax is and 07:05 whether you want to make all new 07:08 customers taxable or and/or all new 07:11 products and services taxable so there’s 07:13 more general settings not the specific 07:16 settings those would be edited here of 07:18 course where you would click on the 07:21 relevant government entity and click 07:24 Edit there you can change the rate 07:37 oops what did you do there I don’t know 07:42 what happened get back on track here 07:59 a little bit more about those general 08:06 options that you can edit you know it 08:09 asked do you charge sales tax if you 08:13 sell physical goods typically the answer 08:15 is gonna be yes again the old with the 08:20 old way it used to walk you through 08:22 where you could kind of I don’t know it 08:28 gave me more guidance on what was 08:31 taxable and how much based off your 08:32 locality and everything it just doesn’t 08:34 seem to do that now but so typically the 08:37 answer is gonna be yes but it’s 08:39 complicated topic so make sure you do 08:40 your research you pick a default sales 08:44 tax that’s a drop-down like I showed you 08:47 from previously entered agencies and 08:49 then make all new customer product 08:52 services taxable depends on the nature 08:54 of your business 08:55 but I would imagine that would typically 08:56 be checked also okay so a little bit 09:02 more about tax categories for products 09:04 and services again that sales products 09:06 and services then you want to add it for 09:08 a specific product or service 09:27 so the sales tax category like I said 09:31 it’s a drop-down you can choose either 09:33 taxable standard rate non-taxable or 09:36 choose a special category if you’re 09:38 unsure you might take a look at special 09:40 categories to make sure this particular 09:43 product or service doesn’t fall under 09:45 one of those let’s take a look at that 09:48 here and this is what I was talking 09:55 about how it’ll kind of walk you through 09:57 a little bit as far as different 10:00 products and services are concerned so 10:02 if you were in the business of 10:05 professional services 10:06 you know you might click that look and 10:10 see it’ll narrow it down if your 10:13 services say photographer fall under 10:18 this category you know again you keep 10:22 narrowing it down and check the button 10:26 click the button and hit done and it’ll 10:31 apply the appropriate sales tax given 10:36 your locality like I said and a 10:40 particular product or service if you 10:45 can’t find that particular product or 10:49 service in that special category list 10:52 then just go ahead and click taxable 10:55 standard rate unless you’re certain it’s 10:58 non-taxable I used to be able to check 11:05 the sales tax calculation by looking at 11:10 sales receipt and invoices again as far 11:13 as I can tell that’s no longer an option 11:17 like if we go to all sales here sales 11:21 all sales select receipt or invoice 11:23 click on the sales tax link it used to 11:26 be where sales tax was calculated you 11:30 know it was clickable kind of hyperlink 11:33 in the bottom right and then you could 11:35 viewer edit the sales tax calculation 11:37 from 11:38 there now if we look at for instance an 11:55 open invoice that depends in part what’s 12:03 on the invoice course it’s all 12:06 non-taxable services then if something’s 12:12 not quite right 12:13 no kiddin I see we can click on another 12:17 one here I’m good 12:31 and this one doesn’t have sales tax that 12:37 was a payment though we tried one more 12:40 invoice yeah all right so anyhow like I 12:51 said it used to 12:53 obviously the functionalities gotten a 12:55 lot worse yeah that’s the way it used to 13:00 work it could be that they bring that 13:01 functionality back but the time being as 13:05 far as I can tell it’s gone the sales 13:09 tax enter the old way again and the left 13:12 menu you go to taxes and then sales tax 13:17 in some instances if you do payroll you 13:22 might see payroll taxes as a tab or a 13:30 sub option there but in this case the 13:34 sample companies and set up that way and 13:37 if it were I’m not sure if it would be 13:40 there the way the way things have gone 13:44 with these changes anyhow it did there 13:51 were a bunch of they call them cards or 13:55 whatever across the screen there where 13:57 you know they were kind of graphical and 14:01 easy to navigate like sales tax to was 14:04 their tax break down it showed you that 14:08 you know what you keep an eye on what 14:11 the sales tax do what you had accrued to 14:15 be owing all the agencies in terms of 14:19 set in terms of sales tax and tax break 14:21 down which was kind of the main area of 14:24 the screen it had sales tax amounts and 14:27 what was due this month what was 14:28 upcoming was overdue a lot of great 14:29 information then you had a opportunity 14:37 to view your return which was again 14:39 based on what it hadn’t already been 14:40 entered into QuickBooks Online when it 14:43 was time to pay 14:44 typically that was done on the say 14:47 States website where you would file that 14:49 return but you know it was all prepared 14:53 for him and it would also then record 14:56 the payment quickbooks online when you 14:57 click the record payment button finally 15:00 ur is history in the sales tax settings 15:02 sales tax settings that they do still 15:05 have where you can view at it mentor 15:06 agencies history that’s that the 15:11 comparable thing now is the the sales 15:15 tax liability report and you can view 15:19 previously paid or filed returns so the 15:23 old sales tax center had a lot of great 15:24 information now not as much I mean some 15:29 should does show what you oh here on the 15:31 main screen depending on breaks it down 15:36 by agency and that but it seemed to me a 15:41 lot more user-friendly previously there 15:47 were also the reports in the upper right 15:48 and sales tax liability report which 15:50 still has and taxable customer report 15:53 which might exist in reports now I feel 15:58 like it does let’s take a look here and 16:05 there were also shortcuts in a sales tax 16:07 center on the right side that navigate 16:10 to all the areas that fed into sales tax 16:12 calculation so you could jump straight 16:14 to him from there which was also handy 16:17 now you basically got I can mention the 16:22 sales tax owed that’s the main screen in 16:25 the sales tax center and the sales tax 16:29 liability report kind of your two 16:31 options and still-living talked a little 16:39 bit about the sales tax liability report 16:41 earlier and you select the appropriate 16:42 report period in tax agency and click 16:46 the run report button still loading 16:54 so that basically covers everything look 16:59 I know that was kind of a not the best 17:03 video ever I would love to give you more 17:10 up-to-date information but like I said 17:12 it seems like it’s in kind of in flux 17:14 for the time being so that is what it is 17:17 and I can always record a new video if I 17:20 have to in the future but so I don’t 17:25 know if you run into similar 17:26 circumstances then I did you saw me 17:28 struggling here and everything’s changed 17:30 where it’s located frankly it’s not as 17:33 not as robust as it used to be you know 17:38 and it can be a pain in the butt to deal 17:41 with so you know you’ve got a business 17:44 to run you’ve got sales that need to be 17:46 made and if you don’t have time to DIY 17:49 your bookkeeping you should check out 17:51 bots keeper what it is is a in essence 17:55 it’s a AI based bookkeeping but with a 17:58 human element to kind of qualifying 18:02 things you might say so a lot of the 18:05 tasks that you had to do are automated 18:07 and again you can work more on your 18:09 business you can work on bringing in 18:10 more sales and worry less about data 18:13 entry and worry less about slow internet 18:16 connections and fumbling around with 18:20 backwards changes they’ve made to 18:22 QuickBooks so there’s a link for that 18:25 down in the description if you want to 18:27 check that out and that’s all there is 18:30 so you know I still tried to make even 18:34 though things were a little wacky tried 18:36 to make this video quick into the point 18:38 upfront to get your answers and then if 18:41 you wanted to get into more detail you 18:43 know I tried to do that to try to give 18:45 you as much information as possible give 18:47 you this slides to reference and if that 18:50 worked for him 18:51 I would appreciate a like and if you 18:54 find yourself looking up topics on 18:57 QuickBooks Online fairly frequently and 19:00 want to skip searchbar in the future and 19:04 just check out my channel I 19:07 have posted and will continue to post 19:09 more videos if you subscribe you can do 19:13 that and yeah thanks for watching 19:15 take care
00:01 getting bank transactions into 00:03 QuickBooks Online there are two basic 00:08 ways to do this and the first is to set 00:11 up a bank feed which is connecting your 00:14 bank with QuickBooks Online so that 00:17 transactions automatically come in and 00:21 you do that by going to banking on the 00:25 left hand menu the banking tab and then 00:28 Add Account you’ll search for your bank 00:33 or credit card here and once you find it 00:38 you follow the steps signing into your 00:41 with your bank information and do that 00:46 to could finish the connection and 00:49 that’ll bring in depending on your bank 00:53 anywhere from like 30 to 90 days maybe 00:57 more transactions the other way to do it 01:02 is to manually upload transactions and 01:05 that’s done by going to the same area 01:08 banking banking and then on the Update 01:12 button here the drop down menu click 01:15 that and do file upload so that’s a 01:21 quick answer we can get into a little 01:23 more detail here bank feeds are links 01:28 like I said between your bank and credit 01:30 card accounts and the transactions are 01:34 fed into QuickBooks Online Banking 01:36 Center and that makes it easier to match 01:41 transactions to reconcile your accounts 01:44 in essence between what happens at your 01:46 bank and what you have entered into 01:48 QuickBooks Online so to connect bank 01:53 feeds like I said left-hand menu 01:55 banking Center if this is your first 01:58 time if you haven’t connected any 02:01 accounts yet you’ll select a button that 02:03 says connect otherwise like in a sample 02:07 cup in here they’ve already connected 02:09 accounts so 02:11 in this case we click Add Account as I 02:14 mentioned and like I can’t afford that 02:17 lien you walk you through every single 02:19 step because of the nature of what we’re 02:24 doing here I can’t really connect the 02:26 bank account with this sample account 02:27 company and obviously making accounts a 02:31 little sensitive and not the sort of 02:33 thing you want to accidentally put 02:37 something out there that would you know 02:39 compromise like my bank account on 02:44 YouTube so I wish I could provide a 02:47 little more step-by-step detail but I’ve 02:50 tried to do as much as I can here so as 02:54 I mentioned when you click Add Account 02:57 you’ll select find your bank you’ll in 03:03 most cases you should be able to find 03:05 your bank and should be able to make a 03:06 connection it should be rare that you’re 03:09 not able to and once you enter your 03:13 login information for the bank or credit 03:15 card then you’re gonna choose the 03:17 appropriate account that you want to 03:21 link it to in quickbooks online choose 03:26 the appropriate account rather from your 03:27 bank or credit card and then you’re 03:30 going to choose the account and 03:32 quickbooks online to link it to you’re 03:34 gonna give the account a name and you’ll 03:37 click save’ and that’s how you set up 03:39 the bank feed so as i mentioned also you 03:45 know it depends how much history is 03:47 gonna be brought in from your bank or 03:49 credit card company could be as little 03:51 as 30 days could be up to around two 03:53 years obviously it’s zero days if your 03:57 bank or credit card won’t connect 03:59 quickbooks online so if you want more 04:02 history than that and particularly if 04:04 your bank or credit card won’t connect 04:06 what do you do you have to manually 04:09 upload transactions so when you do that 04:16 there a couple things to keep in mind 04:17 you’re gonna want to first settle on a 04:19 date range because you don’t want to 04:21 import upload transactions rather 04:24 that are already in QuickBooks Online 04:27 because then you’re gonna have duplicate 04:28 transactions so first thing you want to 04:32 do is go to chart of accounts and then 04:35 view register let’s back out of this and 04:41 do just that 04:42 that’s accounting and then chart of 04:43 accounts accounting in the left hand 04:46 menu and if you come down to try to 04:57 accounts you see your checking savings 04:59 whatever account it is you want to 05:01 import transactions into you come over 05:03 to the right hand side here the action 05:05 column and click on view register scroll 05:20 to the bottom of this information and 05:26 you can see the first date for that you 05:32 have the opening balance ok so typically 05:35 what you’re going to want to do is 05:36 upload transactions that occurred before 05:41 before that date of your opening balance 05:43 if you want more of a history in 05:46 QuickBooks Online and so now that you’ve 05:51 got an idea of the date range that you 05:52 need you’re gonna go to your bank or 05:55 credit card online log in and download 05:59 transactions that’s of course going to 06:01 be different for every bank or credit 06:05 card company out there though typically 06:09 the you know it’ll be roughly roughly 06:14 the same it shouldn’t be too hard to 06:15 find you want to make sure that the file 06:18 is in the correct format when you 06:19 download it and particularly so it’s in 06:22 the Clark correct format to upload into 06:26 quickbooks online preferred formats are 06:30 CSV click QBO that’s d preferred 06:36 format qfx and the file size can’t 06:40 exceed 350 kilobytes which shouldn’t be 06:44 a problem 06:45 that would be quite a bit of history 06:48 then you’re going to navigate to the 06:51 appropriate link as I mentioned that’s 06:54 back in banking and file upload or I’m 07:18 sorry I got a little ahead of myself 07:18 there you want to make sure you choose 07:22 the account that you want to upload to 07:26 so by clicking these like Co it’s got to 07:30 go back here now checking savings 07:34 account and that so you would select the 07:37 appropriate account first then you would 07:40 do file upload here’s a couple 07:50 screenshots from my bank you know to 07:54 kind of give you an idea of what you 07:55 might look for when you’re downloading 07:57 transactions from from your bank you 08:01 know in this case it’s under accounts on 08:05 a menu and there’s a specific place 08:07 they’re designated to download 08:09 transactions you know you pick the 08:12 account you want to download from you 08:14 select your date range and you select 08:16 your final type and then you’ll get 08:22 something like this that’ll you can view 08:25 in Excel and you know then it should be 08:30 ready to be uploaded so it’s beginning 08:36 upload you’re gonna come to 08:40 the screen that was that earlier and 08:44 again I can’t walk you through this 08:46 completely but you’re gonna get the 08:49 browse for the file to upload and in 08:58 this case yeah it won’t let me don’t 09:01 have a final it won’t let me do it but 09:03 you’ll select that file and it’ll walk 09:06 you through the steps they’re basically 09:11 two to getting that information uploaded 09:14 into quickbooks online so you select the 09:19 account that you want to upload to 09:21 double check that and you want to it’ll 09:27 match it’ll make sure everything’s 09:28 mapped correctly that it’s putting you 09:31 know credits into credit call and debits 09:32 in the debit column etc and you want to 09:38 match those columns make sure the same 09:41 and they’ll give you one last chance to 09:42 edit the information that you’re 09:44 uploading and then you’ll select let’s 09:46 go and so once you get those uploaded 09:49 into quickbooks online you’ll want to 09:52 categorize the transactions and that’s 09:57 basically will be down here in this 10:00 column and the savings isn’t a good 10:03 example look at the checking here see 10:09 some of them are uncharacterized income 10:13 you’ll want to make sure every single 10:15 one of those transactions is in the 10:19 correct category quickbooks online i 10:23 don’t know specifically what they mean 10:25 by this but they say until you do this 10:26 the transactions will not quote unquote 10:28 fully be in your account then once 10:32 everything is categorized you might want 10:36 to reconcile the transactions it’s not 10:39 completely necessary but QuickBooks 10:42 advises that you do that and you may 10:44 need to edit your opening balance if 10:46 you’re uploading transactions that took 10:48 place before the eyes update 10:53 so the simplest thing to do course is to 10:57 connect that bank feed but there might 11:01 be circumstances where you want more 11:03 information than can be provided in that 11:05 bank feed so you know you you’ll upload 11:10 transactions if you don’t have time to 11:14 do it yourself with bookkeeping isn’t 11:17 your thing 11:17 check out bot keeper I’ll have a link 11:20 down in the description of this video 11:22 and basically what ba keeper does is 11:26 mixes a I you know automation with a 11:31 human element to do your bookkeeping for 11:33 you and allows you to work more on your 11:36 business particularly work more on sales 11:39 and then bookkeeping itself and as I 11:43 mentioned there’s a link to that down in 11:44 description so that’s all I got for 11:47 getting bank transactions into 11:50 QuickBooks Online if you thought this 11:53 video was you know like a quick answer 11:56 to shorten to the point answer but also 11:58 the detail that I went into and that let 12:02 me know by giving me a like please and 12:05 if you have another they find yourself 12:08 looking up information about QuickBooks 12:10 Online frequently and I think you might 12:13 need to find out find more how-to videos 12:16 in the future or subscribe
00:00 adding vendors and QuickBooks Online the 00:05 quick way or the quick explanation is to 00:08 simply go to expenses and quickbooks 00:11 online and click on benders and click 00:15 the new vendor button the green one on 00:18 the upper right enter as much 00:20 information as possible about the vendor 00:23 save and the new vendor should appear a 00:28 new list below if you need to enter a 00:30 lot of new vendors and then you’ll 00:32 probably want to import their 00:34 information you do that by clicking the 00:35 little drop down arrow behind new 00:37 vendors and click import vendors you’ll 00:43 be taken to this screen where you can 00:47 browse for your list your Excel document 00:54 with the vendors and click Next 00:58 map your fields and make sure what your 01:01 fields are match what QuickBooks expects 01:05 them to be or needs them to be click 01:07 Next give it one last chance to edit 01:10 everything all the different fields and 01:12 click import and that’s the quick answer 01:19 so now we can talk about adding vendors 01:22 a little more in-depth okay so there’s 01:24 two basic reasons that you would want to 01:28 add vendors to quickbooks online and the 01:32 first is because you want to save time 01:34 entering the information about vendors 01:36 on purchase forms if you have vendors 01:40 saved and then you can just choose them 01:42 from a drop-down menu all the 01:43 information you entered on that vendor 01:45 information screen will automatically 01:47 populate things like address terms those 01:51 sorts of things so it’ll save you time 01:53 second of all it gives you an 01:56 opportunity to run reports about your 01:58 vendors and for instance how much you 02:00 spent on each individual vendor so I’m 02:06 going little more in depth in that 02:07 adding vendors here and we’ll start on 02:10 adding individual vendors and like I 02:15 said and the first step is course to 02:17 navigate to the a vendor screen which is 02:21 lucking menu expenses vendors and then 02:23 click new bedroom like i said when the 02:27 new vendors added a little show up from 02:29 the list below so as I said expenses 02:34 vendors click that new vendor you’ll get 02:40 the vendor information screen here and 02:45 watching far ok so most of these fields 02:50 are pretty self-explanatory yeah first 02:54 fields company 02:55 now if the year leonard is an individual 02:57 not a company can understand last name 03:00 here these fields here or more if you 03:04 had like a contact maybe a sales person 03:09 or something at the vendor company but 03:14 if it’s just an individual their first 03:16 and last name camera display name as 03:19 this is where you can change if you the 03:24 way it’s displayed if you wanted to 03:25 display do something different from the 03:27 company you can specify that there the 03:31 print uncheck as option allows you to 03:35 change how the name will be displayed 03:41 the vendors name on the checks issued to 03:45 them for payment if you want that to be 03:48 something different besides the company 03:49 name specify that here address obviously 03:54 pretty self explanatory notes ok this is 04:00 information that you can enter about the 04:02 vendor that will only be seen by people 04:03 in your company so the vendor won’t see 04:08 this and you know you can enter any 04:12 anything that you feel is appropriate or 04:15 that somebody who’s working with your 04:18 books might need to know or need a 04:21 reference about this 04:22 vendor attachment says is where you can 04:27 attach files is such as maybe you know a 04:32 PDF of a w-9 or contracts or anything 04:35 else that’s specifically this vendor and 04:39 so you want to be able to readily find 04:46 let’s see information and an email phone 04:54 number fax number 04:55 oh that website self-explanatory 04:59 then we got a couple of fields here on 05:01 this screen you only see billing rate in 05:05 other instances you might see cost great 05:07 information about DS was a little tough 05:12 to come by but here’s my interpretation 05:16 first of all the billing rate this is 05:19 that the vendor provides a service so an 05:21 example might be a lawyer okay in that 05:26 case you know they build my day an hour 05:27 so you would enter whatever that rate 05:29 may be $100 $200 $300 05:33 whatever the cost rate will only appear 05:40 I think if you have activated projects 05:45 for your company okay and then if the 05:49 vendor is a contractor 05:52 so again information is a little hard to 05:56 find on that but you know it’s only a 06:00 field that will be used under certain 06:03 circumstances terms it’s pretty 06:08 straightforward 06:08 these are the default payment terms the 06:11 defender has you can always change these 06:14 you know when you enter on the purchase 06:19 form to what the actual terms are but if 06:24 they’re gonna consistently give you the 06:26 same terms then you can you know have 06:31 this information populate automatically 06:34 opening balance 06:36 in the answer of date for that opening 06:37 balance they’re usually gonna be left 06:40 blank QuickBooks recommends that you 06:43 leave it blank because there will be no 06:47 details about the balance captured no 06:50 transactions that will add up to equal 06:54 that balance if you do enter them out 06:56 here it’s going to increase your 06:58 accounts payable and decrease your 07:03 opening balance equity okay so keep that 07:08 in mind if the you’re bringing in an 07:11 opening balance QuickBooks recommends 07:13 you know entering the transactions and 07:18 creating a balance that way we can 07:23 outnumber ok so this is the lenders 07:26 number for your business and apostrophe 07:31 in their vendors number for your 07:34 business I know show up as a memo on the 07:37 check so this isn’t your number for the 07:40 vendors the vendors number for you ok 07:44 business ID numbers of being the 07:47 employment identification number or 07:50 social security number and that is used 07:52 when you create a 1099 for this vendor 07:55 if you create a 1099 if you do plan on 07:58 creating a 1099 you’ll want to check 08:01 this track payments for 1099 bucks ok 08:05 because that will make sure those 08:09 vendors included when you run the 1099 08:11 wizard as a rule of thumb if you know 08:15 maybe you know intuitively this is a ten 08:18 and a nine vendor maybe now I’m new to 08:20 this and the rule of thumb for issuing a 08:24 1099 is when you’re purchasing services 08:27 from this particular vendor and if 08:31 they’re unincorporated okay if they meet 08:35 both those check both those boxes then 08:38 you’re probably going to be issuing a 08:39 1099 08:42 so let’s look at the second method of 08:48 creating new vendors and it’s importing 08:50 a vendor list and again to do that it’s 08:57 this new tender button except you’re 08:59 gonna click the little drop down arrow 09:01 you can select the import vendors okay 09:07 what I recommend you do before you make 09:12 up this list and Excel of your vendors 09:16 and all their information is to download 09:17 this sample file click here and then 09:20 you’re gonna get a sample file that 09:22 looks something like this and the reason 09:24 I recommend that is because all of your 09:27 fields are going to be laid out for you 09:29 here okay it’s basically a template for 09:32 your upload and that’ll just make the 09:35 process of uploading this information 09:38 that much easier so you’ll get a file 09:40 that looks like this you want to go 09:42 through select all this dummy 09:46 information so to speak and delete it 09:51 okay and then re-enter the information 09:55 about your particular vendors once 10:01 you’ve done that and save it you can 10:03 browse for that file select it and click 10:12 next thing so then it’s gonna come to 10:16 this map data step and you know you’re 10:21 gonna compare your fields to the 10:24 quickbooks online fields make sure the 10:26 same in most cases usually quickbooks 10:29 online smart enough to know what’s what 10:32 but just make sure you don’t have a fax 10:34 number going to a phone number 10:37 you know something else you know the 10:41 field one of your fields going to the 10:44 wrong field in quickbooks online if you 10:47 okay with all of that click Next then 10:51 you better the import step this is one 10:53 last chance to edit 10:54 any of this information for all your 10:57 different vendors see for instance down 10:59 here we’ve got this note that was 11:04 included as a vendor okay so we would 11:06 just check that to not include it and in 11:11 this case we should be good to go click 11:16 import it’ll tell you how many total 11:21 were successfully imported and you’ll 11:24 see them all down here in your then the 11:27 list thing so that is it those are the 11:36 two main ways to and offenders the 11:39 quickbooks online and if you don’t have 11:45 time to DIY your bookkeeping you know 11:49 and maybe you don’t enjoy the 11:52 bookkeeping aspect a lot of people don’t 11:54 maybe you’d like to work more on your 11:56 business more than data entry work on 12:01 increasing sales you know helping your 12:05 business grow and less time on 12:09 bookkeeping and then take a look at ba 12:12 keeper that ba keeper this company i 12:16 found apparently to google back start up 12:19 and day what it does is uses AI they had 12:27 a lot of the bookkeeping and then uses 12:31 your people to kind of where necessary i 12:36 guess is the way they put it you know 12:41 with my understanding is you can take as 12:43 much control or as little as you won 12:45 over it 12:45 because what you have ba keeper do for 12:48 you and i know that it also ties in with 12:51 quickbooks online so if you like to 12:53 quickbooks online interface and i want 12:56 to be able to run reports or are used to 12:58 it or that 12:59 you know again you can use Bakke burn to 13:03 handle some of the things that can be 13:06 easily automated the the menial 13:09 transactions so to speak so there is a 13:13 link for that down in the description to 13:17 learn more from what I looked up about 13:20 the company it’s really well reviewed on 13:22 kaptara and other sites so if your book 13:26 he was driving you crazy you might check 13:28 that out anyhow if you thought this 13:32 video was a fairly short and to the 13:34 point but detail enough to give you 13:36 information that you needed give it a 13:38 like and if you’d like to not worry 13:44 about searching around on other 13:47 quickbooks online topics and like save 13:50 time you can subscribe click on my 13:52 channel I’ll have other QuickBooks 13:55 Online videos up and hopefully
Products and services can be easily added and maintained in QuickBooks Online.
Products and services in QBO are the items you buy and sell to conduct business. Keeping this list of items well maintained will help ensure that your sales and purchase forms have the information they need. It will also contribute to more useful reporting for your small business.
What are products and services in QuickBooks Online?
Products and services are the items that appear on sales and purchase forms. If you plan on using these forms, then you should take the time to enter all your products and services into QBO.
Each item will be linked to an account in your Chart of Accounts. Every time a product or service transaction takes place, an entry is made.
Whether you sell products, services, or both depends on the industry you’re in and the nature of your business.
Credit: qbo.intuit.com
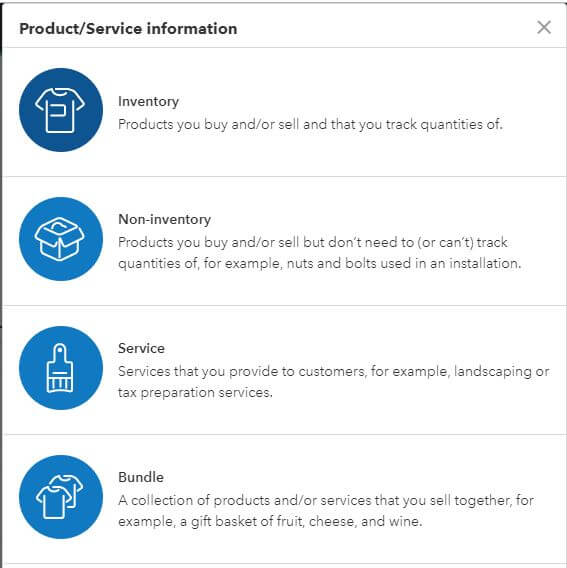
Inventory
These are products that you purchase and/or sell. Inventory quantities are tracked. In order to manage inventory, you must have a QBO Plus subscription.
For example, if you own a boutique clothing store, the clothes you sell would be inventory.
Non-inventory
These are items that you buy and sell but don’t want to keep track of the quantity on hand.
Hand soap for an auto mechanic is an example of a non-inventory item.
Service
This is something that you sell which is intangible.
Delivery of your product is an example.
Bundle
A grouping of products and/or services that you sell together.
A restaurant that offers a meal (main, side, and drink) is an example of a bundle.
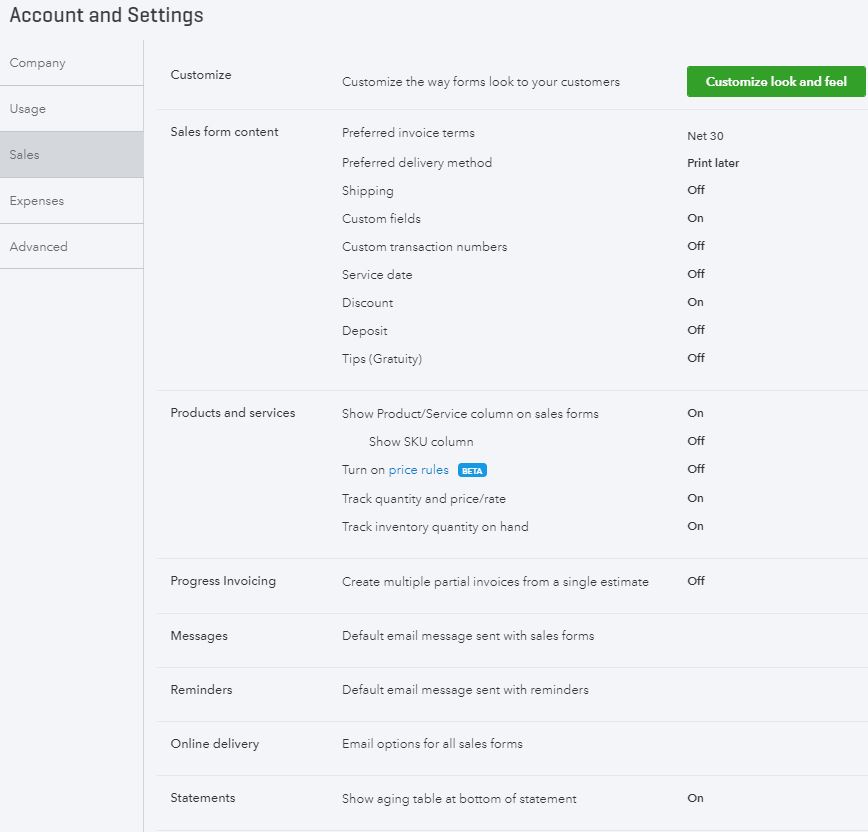
Products and services settings
Credit: qbo.intuit.com
If you’ll remember, Products and Services settings are accessed by clicking the gear icon in the upper-right. Then Accounts and Settings (below Your Company).
Products and services settings are a sub-section of Sales settings. Check the box next to the features you want to utilize and click “Save” when you are finished.
Show Product/Service column on sales forms
This option must be turned on in order for the product/service column to appear on sales forms. If it is off, your customers won’t see details about the products and services involved in the transaction.
Show SKU column
SKUs are used to track inventory. Turning on this feature will add a SKU/barcode column to sales forms. If you have a considerable amount of inventory to track, you should check the box to turn this on.
Turn this on too if you track inventory. It will add rate and quantity fields to estimates, invoices, and sales receipts.
Track inventory quantity on hand
Another feature that should be turned on if you plan to track inventory. Once you do, QBO will keep track to stock levels for products.
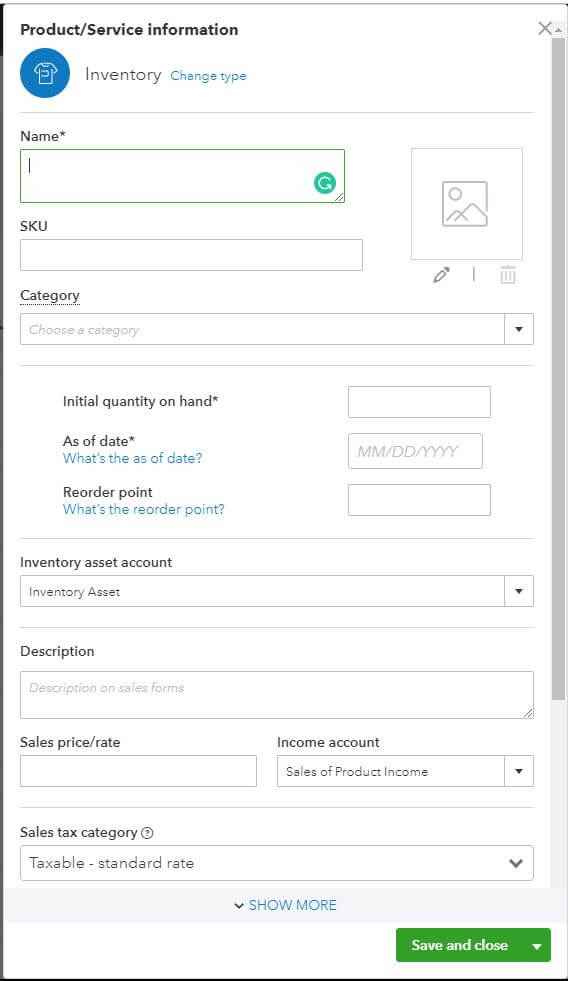
How to add products and services to QuickBooks Online
Credit: qbo.intuit.com
Every product or service you add will start with clicking on the gear icon in the upper-right part of the screen. From here, you will select “Products and Services” underneath Lists.
Next, select click on the green New button.
Choose whether you want to add an Inventory item, Non-inventory item, Service, or Bundle.
There are several fields to complete here. The more detailed information you can provide, the better your reporting will be in the future.
Keep in mind that the available fields will be slightly different depending on the type of item you’re adding.
Name and SKU
Name is a description of the product or service. Make it detailed enough, but be aware of the space it will take up on forms and reports.
SKU is a unique combination of letters and numbers used to identify a product or service. You can look at it as shorthand for a given product or service.
Category
If you have many products and services, you can group similar ones into categories. Doing so will allow you to better organize your items.
Initial quantity on hand (Inventory)
Enter the number of units you had in stock on the As of date (below). If your As of date is today, then enter your QOH right now.
As of date (Inventory)
This is when you will begin tracking inventory levels. The As of date can be any date in the past. Your current inventory level will depend on the Initial quantity on hand (above) and the inventory transactions that have taken place since the As of date.
Reorder point (Inventory)
If you would like to be alerted if the quantity on hand drops below a specific level – enter that level here.
Inventory asset account (Inventory)
This is the account where the value of your inventory on hand will be recorded for the balance sheet. By default “Inventory Asset” is selected. If you would like to use a different account, select “+ Add new.”
Description
If you are going to offer this product/service for sale to customers, make sure the checkbox is checked.
Also, write a description for the product or service which will show up on customers’ sales forms. This can be the same as the item’s Name or different.
Sales price/rate
This is the standard price you will charge for this product or service. Don’t worry if you want to charge different customers different rates. You can specify that later, in price rules.
Income account
Here, select the appropriate account to record sales of the product/service to.
Sales tax category (Inventory)
If sales tax has not been set up in QBO, then you might not see this field. Best to have sales tax set up correctly so that QBO can keep track of it accurately.
The Sales tax category you choose will determine the amount owed depending on what the item is and where you sell it.
Two options will be available by default ” Taxable – standard rate” and “Nontaxable.” You’ll also have the option to “Choose a special category” if this inventory item is of a specific type.
If you “Choose a special category” you’ll be taken to a list of item types and sub-types. Choose the appropriate item type and click “Done.”
Credit: qbo.intuit.com
Purchasing information
Credit: qbo.intuit.com
If this is a product or service that you will be purchasing from a vendor, check this box.
Doing so will cause some other options to appear.
Enter the description for this item you’d like to see on purchase forms.
Cost
This is the standard (typical) cost for this item.
Expense account
Like the Income account, this is where purchases of this item will be recorded to.
Preferred Vendor
Choosing a Preferred Vendor for purchased items will speed up purchase order and bill creation.
Select “Add new” if your Preferred Vendor for this item isn’t set up yet. Then, all you’ll need to do is enter a Name for the vendor to make them preferred.
Click Save and close when you’re done.
You’ll then be taken to the Products and Services screen where you will see your newly-created item.
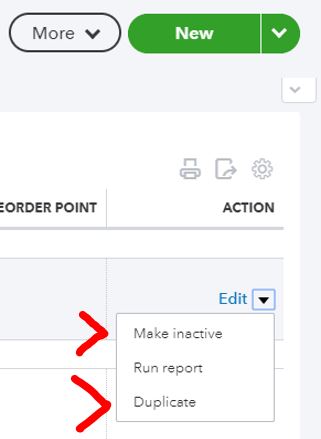
Save time by making duplicates of similar products and services
Credit: qbo.intuit.com
If you’re entering a product/service that is very similar to an existing one – save time by making a copy.
From the Products and Services screen, select the similar product/service and click the down arrow (▼) by the word “Edit” in the Action column. Select “Duplicate.”
The Product/Service Information window will pop up with fields already populated. Make the needed changes and then click “Save and close.”
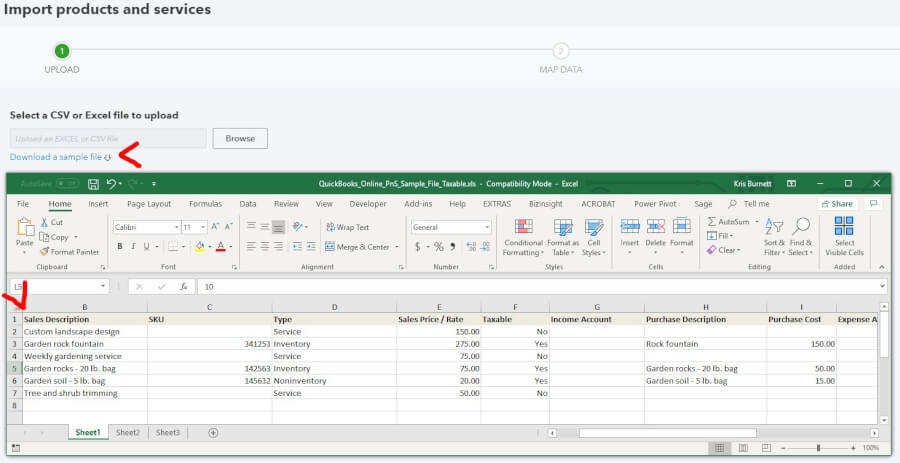
Importing lists of products and services into QuickBooks Online
Click to enlarge Credit: qbo.intuit.com
If you have a lot of new products and services to set up, you might consider importing them into QuickBooks Online.
You will need to have the items (with relevant information ) in a spreadsheet. By downloading the sample file, you can see the order of the columns and the naming conventions. To avoid error, it’s advised to simply fill in your item information into the sample file. Once you’re done, save the file in a location where you can find it.
When you’re ready to upload, go to Sales Center and select the Products and Services tab. Choose “Import a file.”
Browse for the saved spreadsheet and select “Open.”
Ensure that all item information is in the correct fields and click “Import.”
Also, here’s a handy tip:
If you want to update your pricing, across-the-board, you can export a product and services list. Then, you can update prices in a spreadsheet and re-import.
Delete a QuickBooks Online product or service
Is your Products and Services list getting cluttered with obsolete items?
You can reduce the clutter by deleting them. Technically, you’re making them “Inactive.” But, the effect is the same.
To do so, click the checkbox on the left-hand side of the page. Then, at the top, select the Batch actions dropdown. Select “Make inactive” then click “Yes” to confirm.
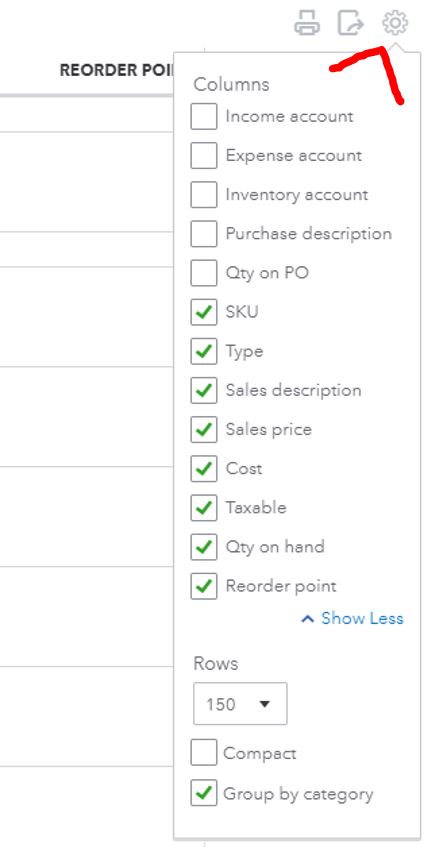
Change the columns in the Products and Services list
Credit: qbo.intuit.com
Another action you can take if you feel like the Products and Services list is too cluttered is to remove columns. You can also add them too.
To do so, click the gear icon. Not the one in the far upper right, the one above the Action heading on the right side of the list.
Here, you’ll see every available column (after you click “Show more”). Click the checkboxes to toggle them on/off.
You can also determine how many rows you’d like to see in the Products and Services list. Plus you can “Compact” the list and “Group by category.”
A customized QBO Chart of Accounts will help ensure that your financial reporting tells you what you need to know to run your small business.
Setting up the Chart of Accounts helps small businesses get off on the right foot in QuickBooks Online. Doing so will help you avoid reporting errors and confusion. A customized QuickBooks Online Chart of Accounts will help you run better reporting. This will help you manage your small business more effectively.
Many people don’t even know what a Chart of Accounts is. Those who do, usually don’t want anything to do with it. It’s a technical accounting task and it seems complicated.
Your (or your bookkeeper/accountant’s) answers to the QuickBooks Online startup questions will determine your default Chart of Accounts. Customizations should still be made to make sure it suits your needs in the future.
What is the QuickBooks Online Chart of Accounts?
A Chart of Accounts is the collection of the categories that make up your business’ financial statements. Every financial transaction your business creates ends up in one (or more) categories.
Examples of categories are:
Income
Product sales
Service sales
Discounts
Expenses
Cost of sales
Material
Labor
Overhead
Marketing
Your salary
Assets
Cash
Accounts receivable
Inventory
Equipment
Real estate
Liabilities
Accounts payable
Loans outstanding
Equity
Common stock
Retained earnings
Click to enlarge Credit: qbo.intuit.com
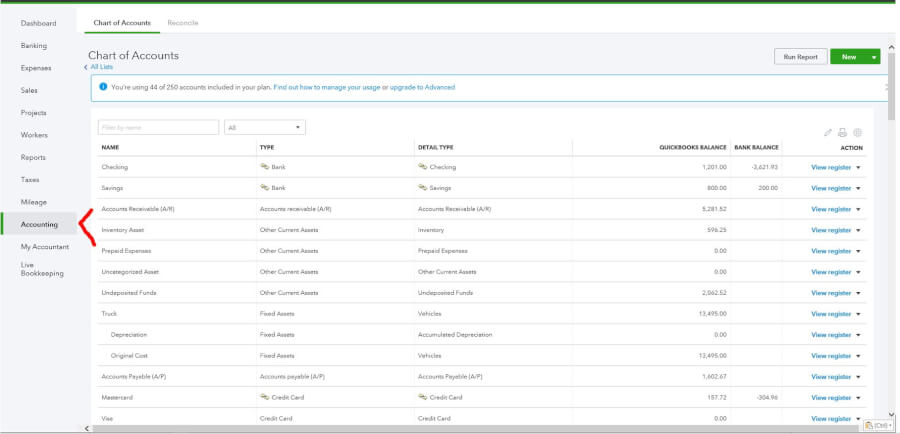
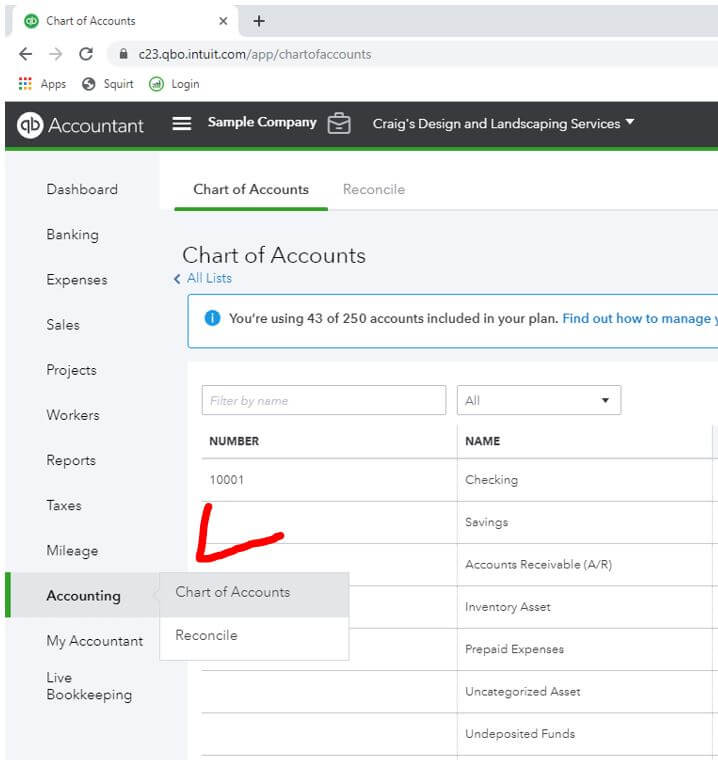
Where do I find the Chart of Accounts in QuickBooks Online?
Hover over Accounting in the left-hand menu. Select Chart of Accounts.
Credit: qbo.intuit.com
Customizing the QuickBooks Online Chart of Accounts
A customized Chart of Accounts in QBO will allow your financial statements to better convey valuable information. Having titled accounts, in the correct order, will prioritize information. Additionally, it reduces the chance of errors and confusion.
Some accounts can not be changed. Accounts Receivable (A/R) and Accounts Payable(A/P), for example.
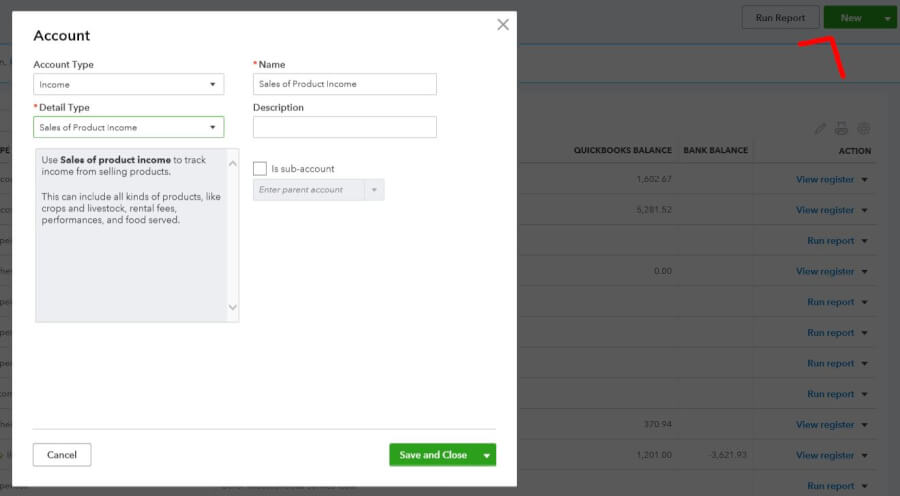
If you create a new account, you’ll be asked to specify an Account and Detail Type. This is very important! What you choose will determine what financial statement this account shows up on. You don’t want a Liability account appearing on the Income Statement. Or an Expense account reflecting as Equity on the Balance Sheet.
New accounts
Click to enlarge Credit: qbo.intuit.com
While in the Chart of Accounts, select the green “New” box in the upper-right corner.
The Account Type you select will give you different options for Detail Type.
Select the Account Type and Detail Type that are most appropriate.
If you would like to Name the account something different, you can do so. A Description can also be entered if you’d like to give more clarification.
Do consider making new accounts for each checking, savings, credit card, and loan account. Also, for your major sources of revenue and expenses. You’ll be glad you have these itemized when you run your financial statements.
Sub-accounts
Sub-accounts break down the balance in an account into subtotals. For instance, a restaurant might have an Equipment account with a balance of $30,000. The Equipment account might have two sub-accounts with balances as follows:
Vehicles: $20,000 Oven: $10,000
The use of sub-accounts allows you to run summary statements and detailed statements depending on how deep you want to dive.
Editing existing accounts
Accounts can be edited by clicking the dropdown arrow (▼) in the Action column. The arrow will be next to View register or Run report. Click “Edit” to make changes.
Some changes will not be allowed by QuickBooks Online. Others will give you a warning that accounting/reporting will be affected.
Think about renaming accounts so that they better reflect your business. Also, don’t hesitate to delete those that you won’t need.
Credit: qbo.intuit.com
Deleting/making accounts inactive
You might not need all the default accounts. Or, if you’ve been in business for a while, you might have accounts that you no longer need.
There’s a sweet spot for the number of accounts you should have. Just enough detail to give you the information you need. Yet, not so many accounts that your financial statements are overly bloated.
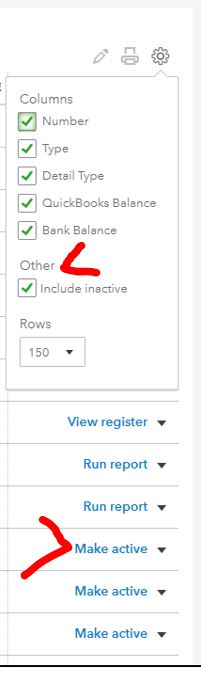
You can make accounts inactive by selecting the dropdown arrow (▼) in the Action column. Select “Make inactive.” Remember that not all accounts can be deleted.
If you find yourself regretting the deletion of an account, you can restore it. Just click the gear icon above the Action header and check the “Include inactive” box. Find your mistakenly deleted account and click “Make active.” It’s like it never happened…
Credit: qbo.intuit.com
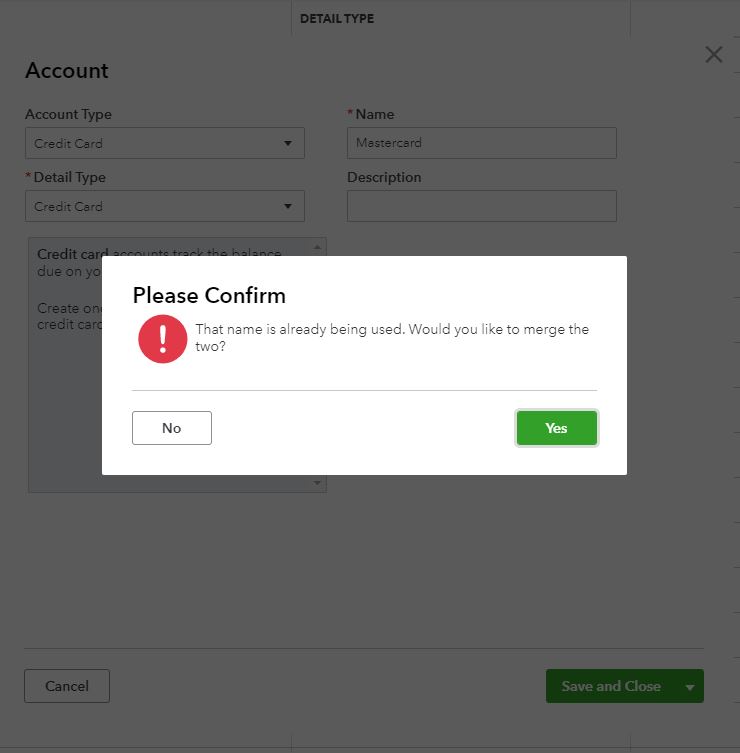
Merging accounts
Maybe, at one time, you thought you wanted two similar, but distinct accounts? But, you came to realize that the distinction was unnecessary.
No worries, accounts can be merged. But, keep in mind that this is a permanent change!
Simply copy the Name of the account you want to keep. Paste that name into the account you don’t need anymore. Make sure the Account and Detail Type are the same. Also, if applicable, make sure that the same parent account is specified.
That’s it! Your Chart of Accounts is now a little less cluttered!
Other tips for optimizing your Chart of Accounts
Once in awhile review your Chart of Accounts to make sure it is still set up to serve you best. Here are some things to review (Credit):
Note accounts that have a $0 or very low balance – consider deleting or merging
Review all account names to ensure that they are accurate and descriptive
Create parent/sub-account relationships where appropriate
QuickBooks Online Chart of Accounts
Are there any other tips or tricks you use to make sure your Chart of Accounts is optimized?
When you create a new QuickBooks Online company, take the time to review the settings and make sure your business gets off on the right foot.
Account & Settings is where a small business owner can customize their QBO experience. From communications with vendors and customers to detailed accounting settings. Reviewing these options will allow you to convey the image you want to your customers and give you the information you need to manage your business.
One account, multiple QuickBooks Online companies
You can have multiple QuickBooks Online companies under one account. Each company will need its own subscription plan.
If you currently have multiple companies under multiple accounts, you can merge them.
Here’s how:
Sign in with the account you no longer want to use
Send an invite to the account you do want to use
From the company you want to switch accounts on
Choose “Company Admin” as the user type
Open the email for the account you want to use – click the invite link
If you can’t send an invite, you don’t have the correct administrative privileges.
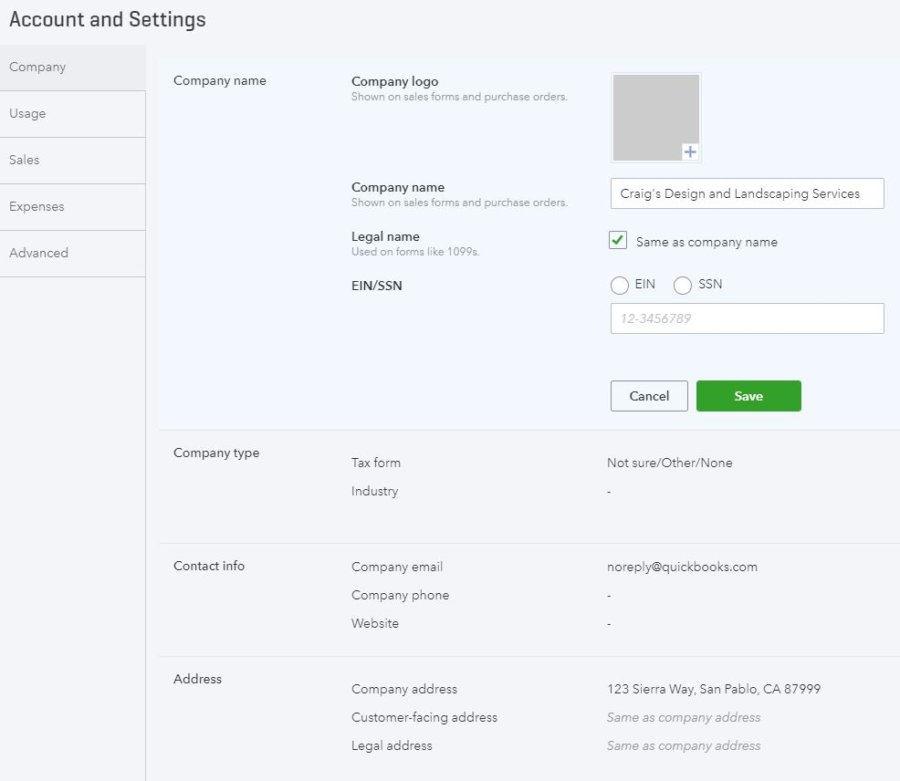
QuickBooks Online settings
Click the gear icon in the upper-right
Select Account & Settings.
Click to enlarge Credit: qbo.intuit.com
Company settings
These fields are pretty straightforward. They will appear on documents such as invoices, sales receipts, and customer estimates.
All of this is required, so I would suggest filling all applicable fields completely.
Company name – Pretty self-explanatory. You’ll enter your EIN/SSN here too.
Company type – LLC, Sole Proprietor, Corporation, etc… Also, your industry will be entered here.
Contact info – Email, phone, and website.
Address – Includes company, customer-facing, and legal address.
Credit: qbo-intuit.com
Sales settings
Customize– Choose a template for your invoices. Also, specify payment options and write a subject line for emailed invoices.
Sales form content – Payment terms are entered here. Other information you want to be included on invoices can also be specified. Things like delivery methods, shipping fields, and custom fields.
Products and services – Add columns for SKUs, quantity, and rates to sales forms. If you want, you can also add rules regarding discounts for particular customers here. Don’t forget to turn on inventory while updating this field too!
Progress Invoicing – Set up customer billing for long-term projects – if applicable.
Messages – Customize the text in emailed invoices. This is also where you’d enter email addresses to cc or Bcc invoices to.
Reminders – Similar to Messages. You’ll set up follow-up communication emails here.
Online delivery – Specify if you want your invoices in PDF, HTML, or plain-text format. If you choose to notAttach sales form as pdf, you can take advantage of QuickBooks Online’s tracking functionality for online invoicing.
Statements – These are sent to customers to summarize all outstanding invoice balances. You can decide if you want all of the detail shown for each invoice, or just a single line.
Taking the time to customize the appearance of your invoices will help them stand out. So, consider taking the time to work through these fields.
Credit: qbo.intuit.com
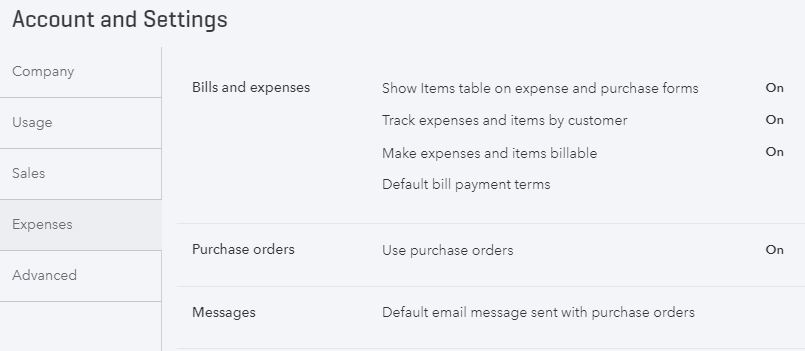
Expense settings
Bills and expenses
Show Items table on expense and purchase forms – Turning this option “On” allows you to see the Items grid when viewing purchase transactions. This is good because it allows you to view reports related to product and service purchases. Note that this option is only available if you have a QuickBooks Online Plus subscription.
Track expenses and items by customer – If you turn this “On,” you’ll be able to select customers when entering expense transactions. This will help you tie costs directly to customers. Also, only available with a QuickBooks Online Plus subscription.
Make expenses and items billable – With this option “On,” you can take expenses and turn right around and bill customers for them. For example, if your customer reimburses for travel expenses, then you would want to utilize this feature. The ability to add a default markup and/or sales tax rate is also available. Again, only available with a QuickBooks Online Plus subscription.
Default bill payment terms – Gives you the option of specifying a default for payment terms. Useful for helping to manage cash flow if your vendor doesn’t set its own terms.
Purchase orders
Use purchase orders – Allows you to add another level of tracking for purchases. Turning this “On” will let you create custom fields in purchase orders. Also, you can automate the creation of serial numbers and transaction numbers. Only available with a QuickBooks Online Plus subscription.
Messages
Default email message sent with purchase orders – If you decide to use the purchase order feature, this is where you can enter a custom message to appear at the bottom of every PO.
Credit: qbo.intuit.com
Payment settings
In order to accept payments from an emailed invoice, in person, or over the phone, you will need to create a QuickBooks Payments merchant account.
There are two plans to choose from.
The first has no monthly fee, but you’ll pay a higher percentage rate per transaction
The other plan has a monthly fee, but a lower percentage rate per transaction
With a merchant account, you can take American Express, Visa, MasterCard, and Discover.
With a merchant account, you can include a “Pay Now” button with your emailed invoices. This will allow customers to make immediate payment. They can do so with a credit card or via ACH. If they choose ACH, there is no fee to you.
Another big advantage of using a QuickBooks Payments merchant account is that every time you get paid, the accounting transactions get made too! Plus, payments are automatically matched with invoices.
Oh, and if you’re using a bookkeeper/accountant, they can possibly get a discounted rate for the merchant account.
If you have an existing merchant account, you can just connect it to your new QuickBooks Online company.
Advanced settings
As the name implies, this is where you can tweak the finer points of your QuickBooks Online account. Unless you have a good grasp of what you’re doing, you might leave these settings to your bookkeeper/accountant. Make sure they know you well if you get third-party help though. The combination of settings you use here is highly dependent on the nature of your business.
These settings can be changed at any time. It’s best to address them when you set up your new QuickBooks Online company.
Accounting
Accounting – Specify the first month of your fiscal year and income-tax year. Plus, if you want to use an accrual or cash-based accounting method. This is also where you will close your books and set your password.
Chart of Accounts – Here, you can opt to use GL account number and set defaults for things like billable expenses, discounts, and shipping.
Other advanced settings
Categories – This setting is where you specify if you want to Track Class or Track Location. Turning this on will include a special field on your forms. Classes can be almost anything you want. For instance salespeople, partners, lines of business, and departments. Location tracking allows you to track inventory by warehouse, area, aisle, bin, etc.
Automation – If you’d like to populate fields on forms based on information entered previously, you can turn this option on. This can save time if you find yourself entering the same information repeatedly.
Projects – Some businesses are more project-based. Contractors, for instance. If you utilize this feature you can track sales, expenses, and timesheets by project.
Time tracking – This setting allows you to add a Service field to timesheets. Doing so will match employee on-the-clock time with services provided to customers. The billing rate and first day of the workweek are entered here too.
Currency – Conducting business in multi-currency is available in QuickBooks Online. Be careful with this setting, though. Once it’s turned on, it can’t be turned off. Extra fields will be added to your QBO database. If you’re importing data, this must be turned on before the import. Finally, you can’t change your home currency. If you conduct business in other currencies, then this setting will obviously be useful.
Other preferences – These are settings that don’t fit in any other category. Things like date and number formats. You can also dictate how you want to address customers (donors, clients, customers, etc.). Plus, be sure to turn on the option that warns you if duplicate bill or check numbers are used.
Credit: qbo.intuit.com
Create new QuickBooks Online company
That’s a summary of the settings that you should review when you create a new QuickBooks Online company.